How To Build A Jekyll Site Using Simple.css
I'm not going to faff around with my usual pre-waffle here, as this is going to be a long post. So without further ado, let's crack on and build a Jekyll site shall we?
By the end of this guide you should have a Jekyll based website with a blog that is hosted for free with Netlify. If you have your own domain name, I'll also show you how to set that up.
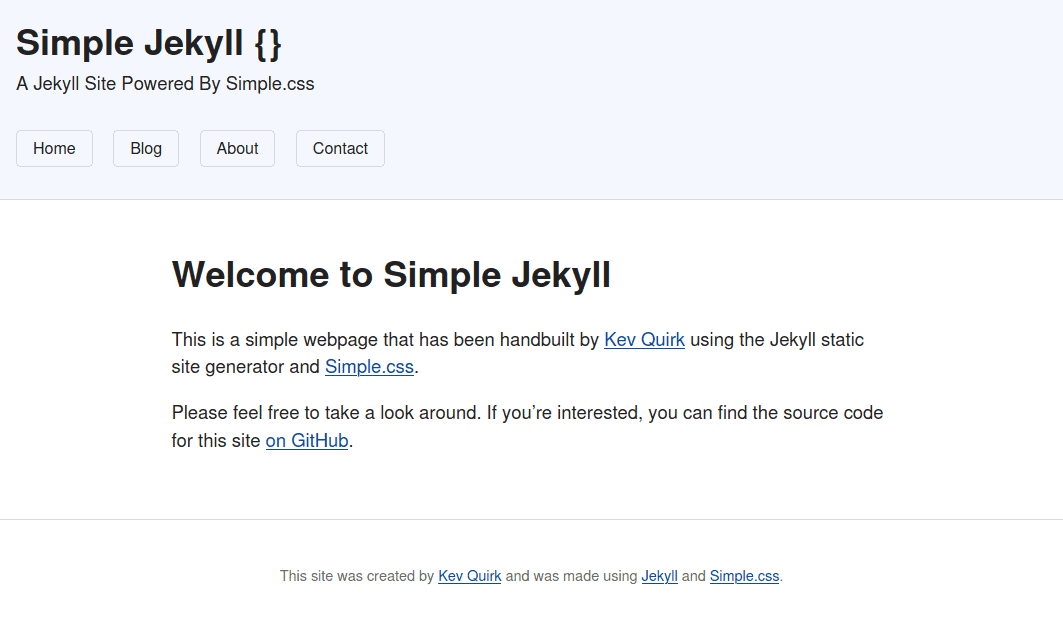
Here's an example of what the site will look like once we're done:
I've created a basic Jekyll site that you can explore that might help as a companion to this process. You can get it here.
Prerequisites
There are a number of things you're going to need before we can build a Jekyll site, so please go through this list before moving on to the rest of the guide.
- Sign up for a GitHub account
- Sign up for a Netlify account
- Install Jekyll on your machine
- Install Git on your machine
- Get a code/text editor - I recommend VSCodium
So, go ahead and work your way through those steps. Once you've done them, come back here and continue. Don't worry, I'll wait…
☕ ☕ ☕ ☕ ☕ ☕
The workflow of Netlify revolves heavily around GitHub to actually build your Jekyll site. Well, Git to be more specific; if you prefer you can use another Git hosting service, like GitLab. I'm a GitHub user, so I'm going to use that in this guide.
Don't worry if you're not familiar with Git, I'll give you everything you need to manage your new site in this how to guide.
Done? Ok, great. Let's get start with the fun bit then…
Step 1 - Setting up your GitHub repo
Sign into your new (or existing) GitHub account and create a new repository using the green New button in the left-hand pane of the screen. From here, fill in the following fields:
- Repository name - This needs to be a unique name within your account. I went with
jekyll-simple.cssin this example. - Description - Just a simple description of what the repository is for.
- Public or Private - If you don't want people to see the source code for your website, choose Private. If you want your new Jekyll site to be open source, choose Public. You can change this later, so don't worry too much.
- Add a README file - I always like to check this so a
README.mdfile is created that contains the repository name and description. - Add .gitignore - Check this box then search for and add the
jekylltemplate. This is so your local cache isn't synced with your GitHub repository when you build your Jekyll site.
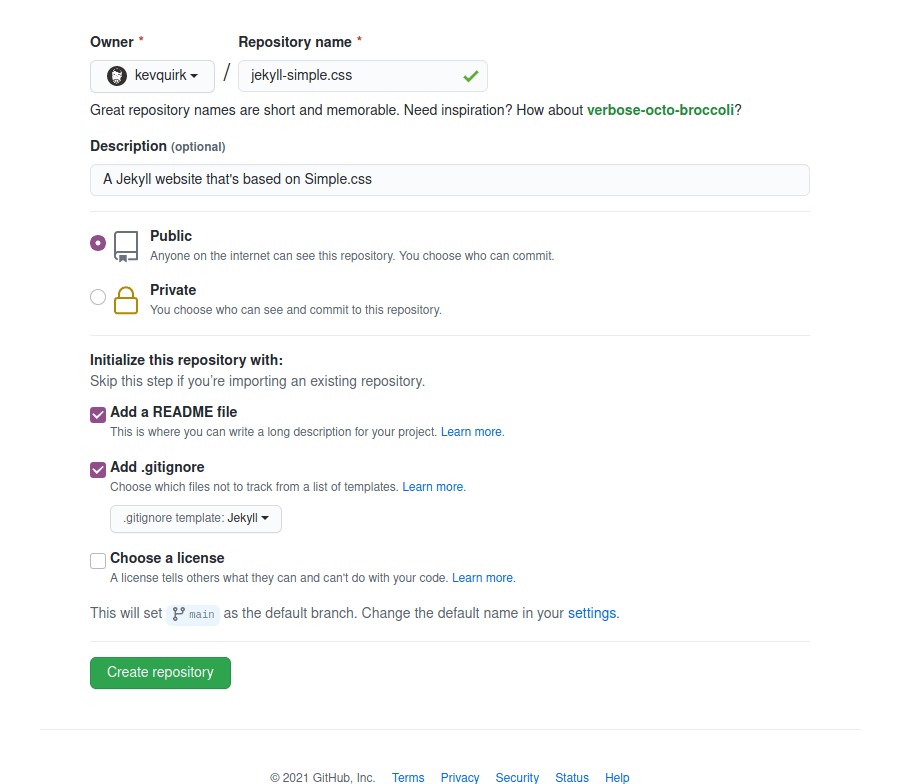
Once you're happy, click on the green Create repository button and your new GitHub repository will be built.
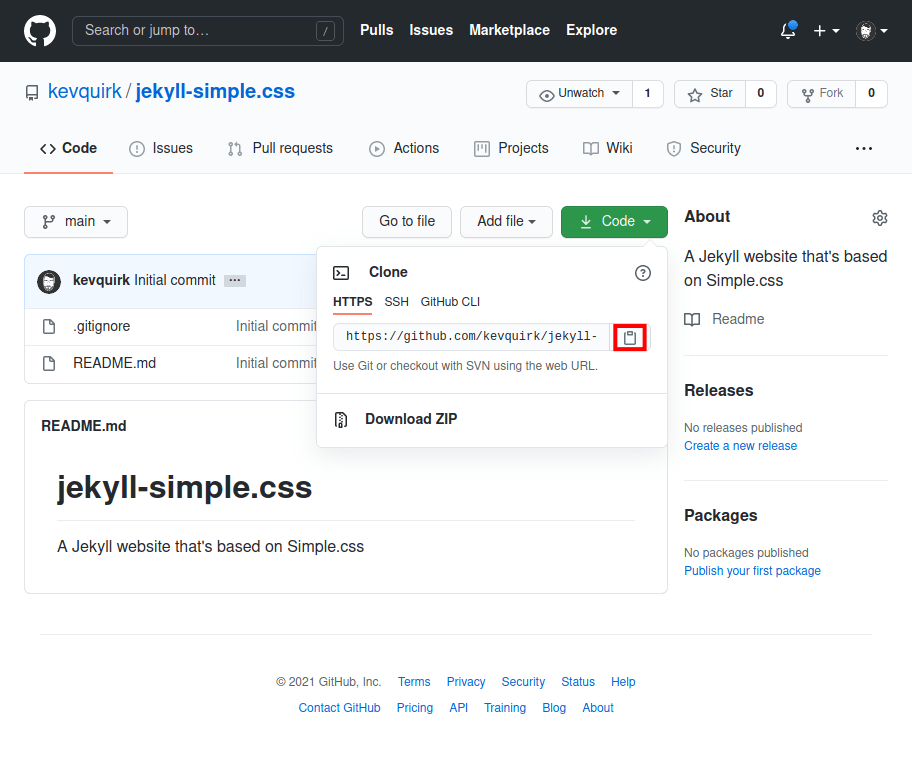
You should now have a fairly bare-bones GitHub repository that contains just 2 files - README.md and .gitignore. What we need to do now is clone the repository so that you can work on it locally.
To do that, click on the green Code button and hit the copy icon (highlighted in the red box below) to copy the repository link.
Note: I would recommend setting up SSH keys and cloning the repository that way, but that is outside of the scope of this guide, so we will just use HTTPS.
Once you have the link to your GitHub repository copied to your clipboard, find the location where your GitHub repository will live on your machine - I personally keep all my repositories in a folder called GitHub in my home directory.
Open a terminal and cd into the directory you want to store your GitHub repository, then run the following command to clone your repository to your machine:
git clone <github-repo-url-you-copied-earlier>So the actual command for my example will be as follows:
git clone https://github.com/kevquirk/jekyll-simple.css.gitYour repository will then be cloned to your machine with an output that looks similar to this:
kev@study-pc:~/GitHub$ git clone https://github.com/kevquirk/jekyll-simple.css.git
Cloning into 'jekyll-simple.css'...
remote: Enumerating objects: 4, done.
remote: Counting objects: 100% (4/4), done.
remote: Compressing objects: 100% (4/4), done.
remote: Total 4 (delta 0), reused 0 (delta 0), pack-reused 0
Unpacking objects: 100% (4/4), 715 bytes | 715.00 KiB/s, done.
That's it for step 1. Your GitHub repository is now all setup and ready for you to start work.
Step 2 - Jekyll folder structure
Right then, now we need to build the Jekyll site folder structure. If you want to understand the rationale for these directories and what they do, I'd recommend taking a look at Jekyll's step by step tutorial.
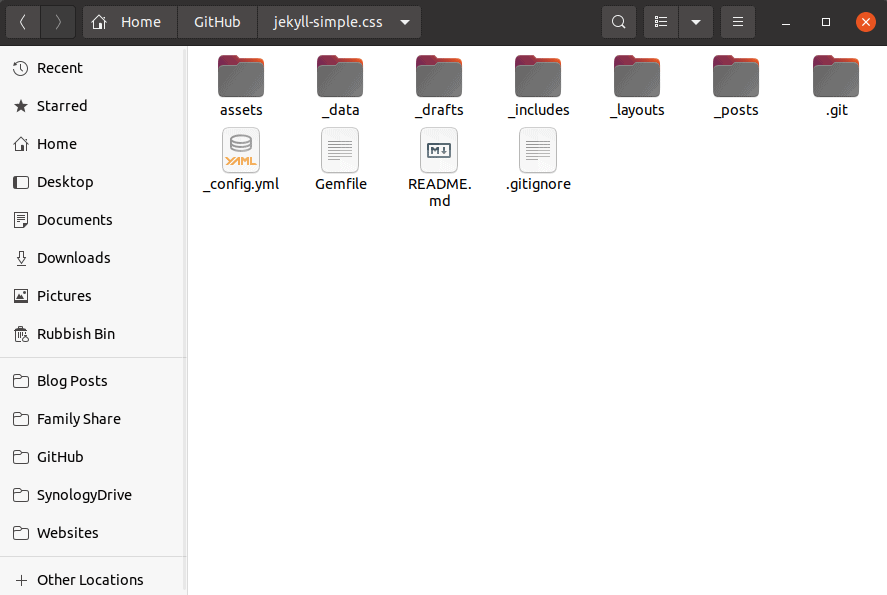
Head into the local copy of your new GitHub repository and make sure hidden files on turned on. You should see three items:
.gitfolderREADME.md.gitignore
We now need to start making the basic folder structure of our Jekyll site. So, go ahead and create the following folder structure:
|- 📂 assets
|     |- 📂 css
|     |- 📂 images
|- 📂 _data
|- 📂 _drafts
|- 📂 _includes
|- 📂 _layouts
|- 📂 _posts
With the exception of assets all of the folders in the above tree have an underscore preceding their name. This is VERY important - if you get this wrong, building your Jekyll site may fail.
The css and images folders shown above are sub-folders of the assets folder.
Step 3 - Jekyll config files
Ok, we now have our basic folder structure, the next step is to create a couple of extremely important config files that Jekyll will need to run. These are the Gemfile and _config.yml files.
First we we will create our Gemfile. So, open up a terminal and cd into your local GitHub repository then run the following command:
bundle initAssuming you have installed Jekyll correctly, this will create the Gemfile in the root of the GitHub repo. Open up the Gemfile and the contents should look like this:
# frozen_string_literal: true

source "https://rubygems.org"

git_source(:github) {|repo_name| "https://github.com/#{repo_name}" }

# gem "rails"
We're going to add a few bits to our Gemfile so that it knows we're not only running Jekyll, but a couple of plugins too. Edit the Gemfile so it looks the same as this:
# frozen_string_literal: true

source "https://rubygems.org"

git_source(:github) {|repo_name| "https://github.com/#{repo_name}" }

# gem "rails"
gem "jekyll"

# Plugins
group :jekyll_plugins do
  gem 'jekyll-sitemap'
  gem 'jekyll-feed'
end
Here we have added two plugins to Jekyll - one adds an RSS feed for your blog (which is very important) and the other creates a sitemap, which is important for search engine optimisation.
Step 3a - _config.yml
Now we will create the _config.yml file. This is arguably the most important file within your Jekyll site. There are tonnes of options that you can add to _config.yml (you can read more about those here), but we will be setting up the basics for our example site.
So, create a new file called _config.yml in the root of the local GitHub repository and add the following to it:
plugins:
  - jekyll-feed
  - jekyll-sitemap

# SEO Stuff
author: <your name>
summary: <a description of your site>
lang: en
locale: en_GB
url: "https://<your domain name>"
baseurl: ""

# RSS feeds
feed:
  posts_limit: 20
Anything that is wrapped in <...> above needs to be edited by you. So my completed version looks like this:
plugins:
  - jekyll-feed
  - jekyll-sitemap

# SEO Stuff
author: Kev Quirk
summary: This is my Jekyll website that is running Simple.css
lang: en
locale: en_GB
url: "https://jekyll.simplecss.org"
baseurl: ""

# RSS feeds
feed:
  posts_limit: 20
Now that's all setup, you should have a GitHub repository that looks something like this:
We now need to run a single command so that Ruby, which Jekyll is based on, installs all the pre-requisites and plugins we need to run our site. So back to your terminal window and run:
bundle
You will see another file called Gemfile.lock be created at this point. Do not delete this file.
We're cooking on gas now, folks! We have our GitHub repository all setup, as well as the basic folder structure for Jekyll and all of our plugins installed. We're now ready to actually build our Jekyll site.
This is the fun bit!
Step 4 - layouts
Jekyll uses a concept called layouts that are used as a framework to surround the content that you write. So for our Simple.css Jekyll site, we're going to use 2 layouts. A default layout that will be used for all pages and a post layout for, you guessed it, blog posts.
Let's start by building the default layout that will be used all over our site. Layouts in Jekyll use HTML, so let's start by creating a very basic HTML page:
<!doctype html>
<html lang="en-GB">
  <head>
    <meta charset="utf-8">
    <meta name="viewport" content="width=device-width, initial-scale=1.0">
  </head>
  <body>
      <header>

      </header>

      <main>

      </main>

      <footer>

      </footer>
  </body>
 </html>
If you were to build your Jekyll site at this point, you would have a basic webpage that would work just fine. But there's a lot more for us to do yet.
Now, the first thing we need to do is start populating the <head> with all the things we need to make the site look right. Namely a favicon, a title, a description and of course our Simple.css formatting.
Step 4a - favicon
This part is simple. Create an image that is a 512px square and save it to your /_assets/images directory as favicon.png. Then, add the following line of HTML to the <head> section of your layout:
<link rel="icon" href="/content/images/favicon.png" />Your <head> should now look like this:
<head>
    <meta charset="utf-8">
    <meta name="viewport" content="width=device-width, initial-scale=1.0">
    <link rel="icon" href="/content/images/favicon.png" />
</head>
If you don't know, the favicon is the icon that displays in the top line of your browser window, among other places. Here's a look at the favicon for this site - it's the dark grey square with “KQ” written in it:

Step 4b - title & description
Next we will add the page title and page description. These are very important when it comes to Search Engine Optimisation (SEO). For this we will use liquid so that our layout pulls the title and description for each page when we build our Jekyll site.
If we didn't use liquid here, the title and description would be exactly the same for each page, which is no good. I'll show you how to define the page title and description a little later on.
So our liquid tags in the <head> will look something like this:
{% raw %}
<title>{{ page.title }}</title>
<meta name="description" content="{{ page.description }}" />
{% endraw %}
The actual liquid tags are the parts wrapped in two curly braces. For example {{ page.title }}. There is one more liquid tag we need to add to the <head>, which is the feed metadata. This will allow us to use an RSS feed with our site using the jekyll-feed plugin we defined earlier in our config:
{% raw %}
{% feed_meta %}
{% endraw %}
If we add all this to our <head>, this is what we have now:
{% raw %}
<head>
    <meta charset="utf-8">
    <meta name="viewport" content="width=device-width, initial-scale=1.0">
    <link rel="icon" href="/content/images/favicon.png" />
    <title>{{ page.title }}</title>
    <meta name="{{ page.description }}" />
    {% feed_meta %}
</head>
{% endraw %}
Step 4c - Simple.css formatting
The final part of formatting the header is to add CSS. Obviously in this guide we're working with Simple.css so we're going to add the minified version of Simple.css from the CDN. This means that our site will always receive the latest version of Simple.css whenever it is updated:
<link rel="stylesheet" href="https://cdn.simplecss.org/simple.min.css">I'm also going to add another CSS file, this one is optional and called custom.css. This will be stored in the /_assets/css directory and will allow you to add your own custom CSS to this site if you wish.
If you don't want to add your own CSS to the site and would prefer to use vanilla Simple.css, feel free to skip adding custom.css.
<link rel="stylesheet" href="/assets/css/custom.css">Let's add these to our <head> section of the layout, which then completes it:
{% raw %}
<head>
    <meta charset="utf-8">
    <meta name="viewport" content="width=device-width, initial-scale=1.0">
    <link rel="icon" href="/content/images/favicon.png" />
    <title>{{ page.title }}</title>
    <meta name="description" content="{{ page.description }}" />
    {% feed_meta %}
    <link rel="stylesheet" href="https://cdn.simplecss.org/simple.min.css">
    <link rel="stylesheet" href="/assets/css/custom.css">
</head>
{% endraw %}
We have now completed the <head> section of the layout, so go ahead and save what we have so far as default.html within the _layouts folder.
Step 4d - the <header> section
Now let's move on to completing the <header> section of our layout. I know, I know, it's very confusing having a <head> and <header> section, but that's HTML for you folks.
The <head> section contains meta data about the site that is invisible to your visitors (unless they look at your source). The <header> sections is the top part of the page on Simple.css that contains the page title, a short description and the navigation menu.
For this we're going to use liquid tags again and the completed <header> section looks like this:
{% raw %}
<header>
  <h1>{{ page.header }}</h1>
  <p>{{ page.description }}</p>

  {% include navigation.html %}
</header>
{% endraw %}
The navigation tag is a little different here, as it's using an includes call. What that does is tell Jekyll to head to the _includes folder and dump the navigation.html file in here.
This makes things really easy to manage because it allows us to have a separate navigation menu from our layouts. So we only ever have a single menu to update when we want to make changes to it. More on that later.
Step 4e - the <main> section
The clue is in the name for the <main> section - this is where the main content of the page goes. So for this section, we only need to include a single liquid tag as follows:
{% raw %}
{{ content }}
{% endraw %}
That's it! That's all you need in the <main> section in order to pull all of the content from your pages.
Step 4f - the <footer> section
Again, this is pretty obvious - the <footer> is the footer of your website that is usually reserved for links to pages like a privacy policy or a licensing notice.
We don't need any liquid tags here as the footer will be the same across the entire site. So our footer looks something like this:
<p>This site was created by <a href="https://kevq.uk">Kev Quirk</a> and was made using <a href="https://jekyllrb.com">Jekyll</a> and <a href="https://simplecss.org">Simple.css</a>.</p>Step 4g - putting it all together
Ok, let's stitch all of that together to show our completed default.html layout:
{% raw %}
<!doctype html>
<html lang="en-GB">
  <head>
    <meta charset="utf-8">
    <meta name="viewport" content="width=device-width, initial-scale=1.0">
    <link rel="icon" href="/content/images/favicon.png" />
    <title>{{ page.title }}</title>
    <meta name="description" content="{{ page.description }}" />
    {% feed_meta %}
    <link rel="stylesheet" href="https://cdn.simplecss.org/simple.min.css">
    <link rel="stylesheet" href="/assets/css/custom.css">
  </head>
  <body>

  <header>
    <h1>{{ page.header }}</h1>
    <p>{{ page.description }}</p>
    {% include navigation.html %}
  </header>

  <main>
    {{ content }}
  </main>

  <footer>
    <p>This site was created by <a href="https://kevq.uk">Kev Quirk</a> and was made using <a href="https://jekyllrb.com">Jekyll</a> and <a href="https://simplecss.org">Simple.css</a>.</p>
  </footer>

  </body>
</html>
{% endraw %}
The next thing we need to do is build another layout for our blog posts, but that's nowhere near as complicated as the default layout.
Step 4h - the post layout
This is the first time we're going to introduce front matter. Front matter is kind of like the meta data we put in the <head> section of our layout above, except it is used by Jekyll site during the build process, so no one will be able to see this once the site is built.
Let's start by creating a new file in the _layouts folder called post.html. Then, at the very top of the page, add the following front matter:
---
layout: default
---
Front matter is marked up by 3 dashes above and below the front matter block. So in this example we only have a single line of front matter which is telling Jekyll to take the default layout and add the following parts to it.
This means that all of our pages and posts will look the same, we're just adding some extra goodness for posts.
This is what the finished post layout will look like:
{% raw %}
---
layout: default
---

<p>{{ page.date | date_to_string }}</p>

{{ content }}

<br>
<hr>

<h2>Looking for comments?<h2>

<p>I don't have comments on this site as they're difficult to manage and take up too much time. I'd rather concentrate on producing content than managing comments.</p>

<p>Since there are no comments, feel free to contact me <a href="/contact">contact me</a> instead.</p>
{% endraw %}
So here we're taking the default layout, then adding a date to the top of the post using the date_to_string tag, then comes the post content, followed by a horizontal rule and a message about why comments aren't available.
All of this is wrapped in the default layout because we called that in our front matter. So we don't need to do anything with the <head>, <header> or <footer>.
Let's put the finishing touches to our layout by formatting the navigation menu correctly.
Step 5 - navigation
The navigation is split into 2 separate files. This sounds counter-intuitive, but it will make sense as we progress through this, I promise!
Let's start by creating a file called navigation.html in the _includes folder. Inside this file we will add some simple HTML that contains a couple of liquid tags. Here is what it looks like:
{% raw %}
<nav>
  {% for item in site.data.navigation %}
    <a href="{{ item.link }}">{{ item.name }}</a>
  {% endfor %}
</nav>
{% endraw %}
What this code does is tell Jekyll to pull data from the navigation.yml file within the _data folder, and stitch each entry in that yml file into a new hyperlink within the navigation menu.
So next we create navigation.yml within the _data folder and its contents will look like this:
- name: Home
  link: /
- name: Blog
  link: /blog
- name: About
  link: /about
- name: Contact
  link: /contact
If you want to, you can just add a list of hyperlinks within the navigation.html file, but by adding the navigation.yml file, it makes it nicer and easier to manage your navigation menu.
From then on, all you need to do is edit the navigation.yml file in order to add, edit or remove items from your menu. You can also add external links like this:
- name: GitHub
  link: https://github.com/kevquirk
Congratulations! You now have all the layouts and configuration done for Jekyll, so we can now start producing content.
Step 6 - creating pages
So let's start by creating a homepage. In Jekyll content is created using Markdown, which is basically a simplified version of HTML. If you've never used Markdown before, this guide should help you get started. When you trigger a build of your Jekyll site, the markdown is converted to plain old HTML, which can then be parsed by your browser.
Right then, back to the root of your local GitHub repository, let's make a new file called index.md (md is short for markdown). In that page we're going to start with some front matter. Once again, this is to tell Jekyll what the configuration options for this page are. Here is what the front matter of index.md will look like:
---
title: Simple Jekyll - A Jekyll site powered by Simple.css
header: Simple Jekyll {}
summary: A Jekyll site powered by Simple.css
link: /
layout: default
---
So let's breakdown what this front matter is telling Jekyll to do:
title- This is the title of the page. It will be pulled into the liquid tag we created in the default layout. It is used for SEO, as well as on the browser title bar.header- This is the title that will be displayed in the<header>section of the page.description- This will be used for both the HTML meta description for SEO purposes, as well as the descriptive line displayed in the<header>right above the navigation menu.permalink- This is the link for the page. Since it's our homepage, we want it to be the root of the website and we depict this with/.layout- This tells Jekyll to use thedefault.htmllayout we built earlier.
All we need to do now is add the content we want to display on our homepage using markdown. Once we've done that, our raw index.md file should look something like this:
---
title: Simple Jekyll - A Jekyll site powered by Simple.css
header: Simple Jekyll {}
summary: A Jekyll site powered by Simple.css
link: /
layout: default
---

# Welcome to Simple Jekyll

This is a simple webpage that has been handbuilt by [Kev Quirk](https://kevq.uk) using the Jekyll static site generator and [Simple.css](https://simplecss.org).

Please feel free to take a look around. If you're interested, you can find the source code for this site [on GitHub](https://github.com/kevquirk/jekyll-simple.css).
Step 6a - other pages
Once you're happy with your homepage, you can continue this process by creating the other pages. So, let's create about.md and contact.md too.
Using the front matter from index.md as a template, here is the front matter for about.md. I'm sure you're getting the gist of this by now, so I'll leave you to do contact.md yourself.
---
title: About | Simple Jekyll
header: About Simple Jekyll
summary: This page tells you a little bit about this website.
link: /about/
layout: default
---

Lorem ipsum dolor sit amet consectetur adipiscing elit ullamcorper integer scelerisque luctus, lobortis praesent erat est penatibus fringilla potenti libero facilisis aptent. Vestibulum mi posuere faucibus aliquet lacinia.

Pharetra donec gravida eu interdum, cum ultricies placerat lectus montes cursus torquent tempor non, bibendum congue nascetur primis proin fames conubia maecenas praesent. Rhoncus purus proin et suscipit egestas class mauris curabitur condimentum, quis dis porta velit commodo nostra morbi turpis.
Step 7 - building the blog
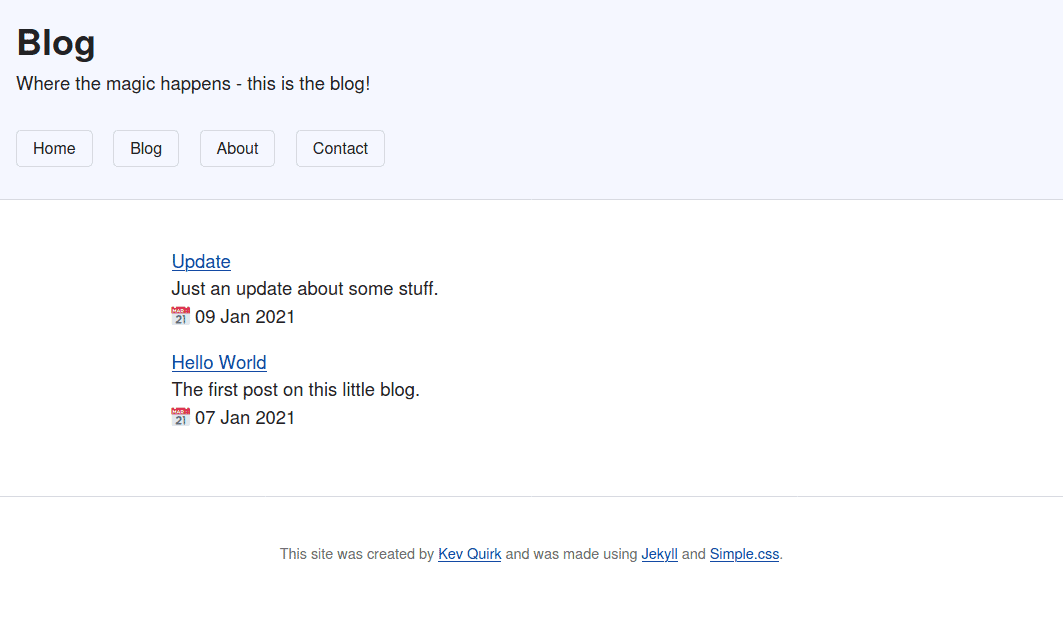
The blog page is a little different than the other pages on your Jekyll site, that's because it doesn't just display static content, oh no dear reader. The blog page needs to parse all of the files within the _posts directory and display them as blog feed on the page.
To do that we're going to use…you guessed it…liquid!
As per the other pages, we still need some front matter though, so let's start with that first:
---
layout: default
title: Blog | Simple Jekyll
header: Blog
summary: Where the magic happens - this is the blog!
link: /blog/
---
Now, for the contents of the main blog page, we don't want the entire content of all our posts. Instead we will parse through our list of posts and grab the title, description and published date.
We will then display them in a nice little block so people can peruse our blog quickly and efficiently. The liquid code for all this is as follows:
{% raw %}
{% for post in site.posts %}
  <p><a href="{{ post.url }}">{{ post.title }}</a><br>
  {{ post.description }}<br>
  {{ post.date | date_to_string }}</p>
{% endfor %}
{% endraw %}
Pretty straightforward, right? What's happening here is that Jekyll will parse all the files within the _posts directory, it will grab the URL of the post, as well as the title and it will use that to make a hyperlink to the post.
Then, Jekyll will nab the description from your post's front matter, as well as the published date. It spits these out and hey presto, you have a blog page!
Here is what the entire blog.md file looks like:
{% raw %}
---
layout: default
# Blog | Simple Jekyll
header: Blog
summary: Where the magic happens - this is the blog!
link: /blog/
---

{% for post in site.posts %}
  <p><a href="{{ post.url }}">{{ post.title }}</a><br>
  {{ post.description }}<br>
  {{ post.date | date_to_string }}</p>
{% endfor %}
{% endraw %}
So now we have built all of our pages, it's time to start writing some blog posts. Let's crack on, shall we?
Step 8 - blog posts
Blog posts are written in markdown, just like the pages. They still have front matter, albeit slightly different front matter than a page.
When you write a blog post it needs to be stored in the _posts folder with the following name format:
yyyy-mm-dd-some-name.mdThe date in the filename is extremely important as that's what Jekyll uses to display the date the post was published.
So, let's create a new file called 2021-01-09-hello-world.md and save it in the _posts directory.
First we will produce the front matter for the post, which looks like this:
---
title: Hello World
header: Hello World
summary: The first post on this little blog.
link: /hello-world/

---
As you can see our layout is set to post this time around, as we're no longer writing pages, we're writing posts.
Finally, let's add some fake content to the post and call it done:
---
title: Hello World
header: Hello World
summary: The first post on this little blog.
link: /hello-world/

---

Lorem ipsum dolor sit amet consectetur adipiscing elit ullamcorper integer scelerisque luctus, lobortis praesent erat est penatibus fringilla potenti libero facilisis aptent. Vestibulum mi posuere faucibus aliquet lacinia.

Pharetra donec gravida eu interdum, cum ultricies placerat lectus montes cursus torquent tempor non, bibendum congue nascetur primis proin fames conubia maecenas praesent. Rhoncus purus proin et suscipit egestas class mauris curabitur condimentum, quis dis porta velit commodo nostra morbi turpis.
Seeing your work
Ok, so we've finished building the site at this point, but we have no idea what the thing actually looks like. Luckily for us, Jekyll has it's own little web server that you can spin up and use to produce a development version of your site so you can take a peek at what it looks like.
So let's do that shall we. cd into the root directory of your GitHub repository and run the following command:
jekyll sAfter a second or two you will see some output on screen and a link to the development build of your site:
kev@study:~/GitHub/jekyll-simple.css$ jekyll s
Warning: the running version of Bundler (2.1.2) is older than the version that created the lockfile (2.1.4). We suggest you to upgrade to the version that created the lockfile by running `gem install bundler:2.1.4`.
Configuration file: /home/kev/GitHub/jekyll-simple.css/_config.yml
            Source: /home/kev/GitHub/jekyll-simple.css
       Destination: /home/kev/GitHub/jekyll-simple.css/_site
 Incremental build: disabled. Enable with --incremental
      Generating...
       Jekyll Feed: Generating feed for posts
                    done in 0.06 seconds.
 Auto-regeneration: enabled for '/home/kev/GitHub/jekyll-simple.css'
    Server address: http://127.0.0.1:4000/
  Server running... press ctrl-c to stop.
If you now visit http://127.0.0.1:4000 in your browser, you should be greeted with a website that looks something like this:
Well would you look at that, Ma! We just built ourselves our very own Jekyll website, from scratch, using Simple.css.
Pretty cool, huh?
If we then go look at the blog page, we see that our posts are all present and correct. Doesn't this stuff make you feel good? I know it does me!
From here, if you want to add some custom CSS to your site, you can. Just open up the custom.css file within /_assets/css that you made earlier and start hacking away!
Right then, that's the site built, next we're going to look at giving your shiny new blog a home on the internet. For this we're going to be using Netlify.
Setting up hosting
There's no real point in building this fancy new website with Jekyll and Simple.css unless we have somewhere to host it so we can show it to the world. So let's make use of that Netlify account you signed up for earlier and get things setup shall we?
For this example, I'm going to use the domain jekyll.simplecss.org so anytime you see this domain in the example below, be sure to replace it with whatever your domain name is.
Why Netlify?
At this point we could get Jekyll to build the website from source and upload it to any web hosting account via FTP. If you want to do that, run the following command and ignore the rest of this post:
jekyll bThis will output the built site to _site in your GitHub repository. All you need to do then is upload the contents of _site to your hosting account and your site is live. However, Netlify has some significant advantages over using this method. Namely:
- It's free.
- You don't have to build and upload your site manually. All you need to do is commit any changes to your GitHub repository and Netlify will see that, run a build and publish it automatically.
By using a GitHub repository to manage the Jekyll site, we also have version control. So if you want to revert back to a previous version of your site, you can do so easily.
Right then, enough of this tomfoolery, let's get on with setting up Netlify shall we…
Initial commit
Before doing anything else we need to push all of our work to GitHub. To do this you need to cd into the root of your local repository then run these 3 commands:
git add *
git commit -m "Initial commit"
git push
So what did we just do there? Well, we first staged all of our new files to be pushed to our GitHub repository. Then we committed the change with a message of Initial commit because it's our first commit to the repository. Finally we pushed all the files to GitHub (you will need to enter your GitHub username and password at this point).
Setting up Netlify
Login to your Netlify account and on the right of the screen you will see a button that says New site from Git. Click that button.
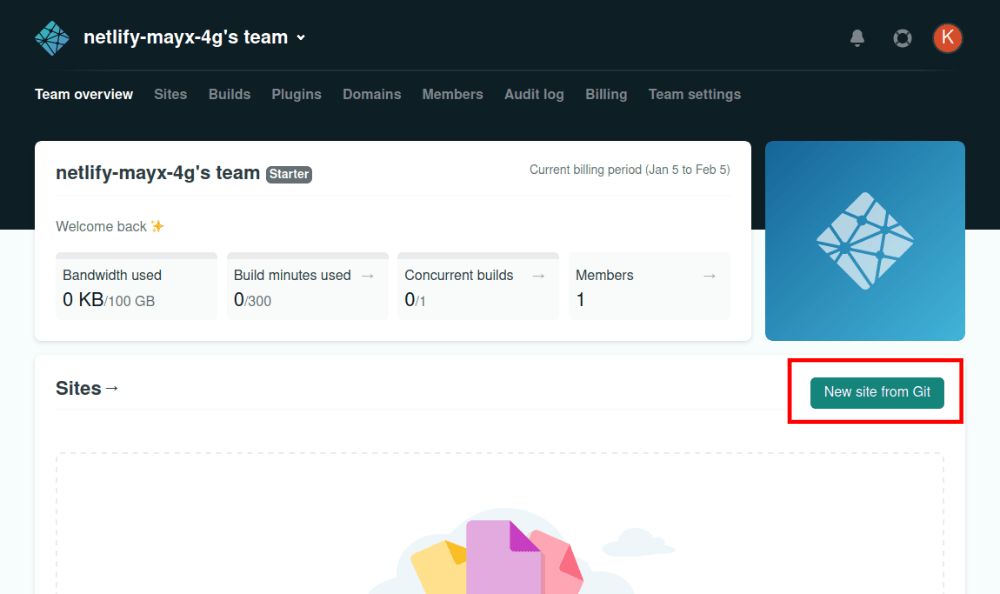
You will now be asked to connect your GitHub account to Netlify. This is so Netlify can keep an eye on your GitHub repository and build/deploy the site if you make changes.
So, click on the GitHub button and authenticate Netlify. You will then be asked to select a repository for Netlify to keep an eye on. Select the repository you made earlier. In my case that's the jekyll-simple.css repository.
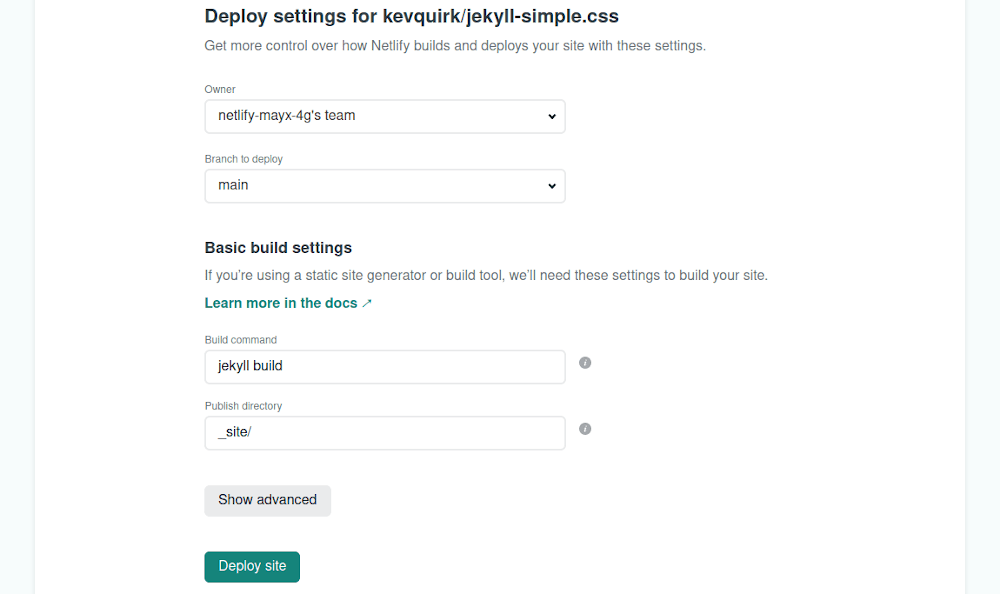
One the third and final step, Netlify should realise that this GitHub repository contains a Jekyll site and will populate the Build Command and Publish Directory fields for you. Leave everything at its default setting and click on the Deploy site button.
Netlify will now go ahead and pull the data from your repository and build/deploy your site. This may take a few minutes, so keep an eye on the status and when it changes to a URL that looks something like <random-string>.netlify.app your site is now live at this URL. Kinda like this:
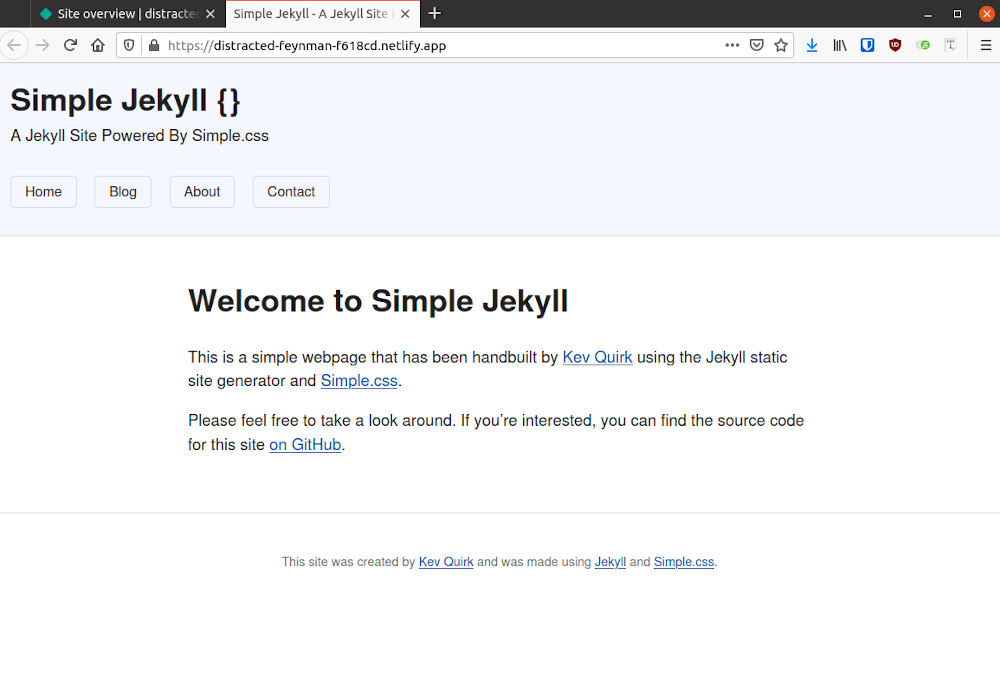
WOOHOO! We now have a Simple.css based Jekyll site that is hosted online for the world to see. You can stop here and use the netlify.app sub-domain if you like, but I strongly recommend having your own domain. So let's set one up, shall we?
Configuring a custom domain
So back on Netlify's Site overview page, click on the Domain settings button. Scroll down a little and click on the Add custom domain button. Put your domain into the field that appears on screen. Like I said, for me this is jekyll.simplecss.org and click on the Verify button.
You will now get a message asking if you're the owner of the domain, assuming you are, click on the Yes, add domain button. You will now see a screen that looks like the one below where Netlify complains that it can't provision an SSL certificate:

Let's fix this error. To do that you need to log in to wherever you host the DNS for your domain. For most people that's going to be the company you registered your domain with.
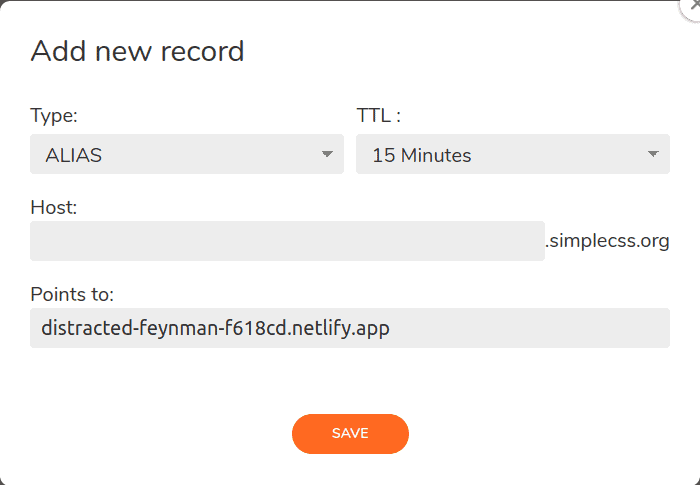
You then need to create one of two records - either a CNAME or ALIAS record. If your hosting provider doesn't support ALIAS records, then I'd recommend ClouDNS. I've used them for years and they're really good.
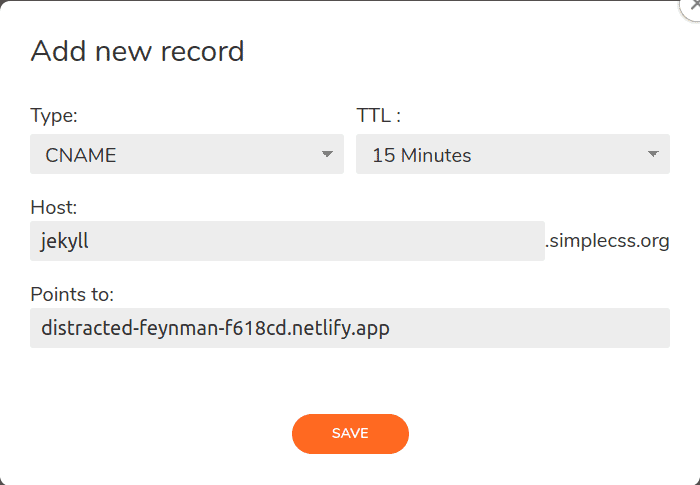
If you're using an APEX domain, for example simplecss.org, you will need to create an ALIAS record. If you're using a sub-domain, for example jekyll.simplecss.org then use a CNAME record.
Since I'm using a sub-domain I'm going to create a CNAME record that points to the <random-string>.netlify.app URL that Netlify automatically provisioned:
If you were to configure an ALIAS record for an APEX domain, the record would look like this:
The TTL can be anything you like. I like to have it short so propagation doesn't take too long.
Once your DNS record is configured, head back to Netlify and hit the Verify DNS configuration button to re-try validating the domain. This may fail again. If it does, try again in an hour or so.
If the verification succeeds, the button will change to Provision certificate. Click this button again and Netlify should issue an SSL certificate so people can visit your site using HTTPS.
Once again, you may get certificate errors at first. This is because Netlify or Let's Encrypt can't see the DNS changes you've made yet. If it does fail, wait an hour and try again. It should succeed.
Once the certificate is issued by Netlify, you should be able to visit your new Simple.css based Jekyll site using your domain name. So the site is now built and published online! ?
But what if you want to make changes to your site? Which, let's be honest here, you're going to want to do from time to time. Let's look at managing the site going forward next.
Managing your site going forward
Build site? ✅ Check. Deploy site online? ✅ Check. Now it's time to look at managing the Jekyll site for things like publishing new posts, editing pages, or updating the theme. Let's look at managing draft posts and publishing new content first shall we?
Managing drafts
Think back to when we created the folder structure. Seems like ages ago, right? Well, we made a folder called _drafts - this folder is for (shock horror) draft posts.
Managing drafts in Jekyll is really easy; just create a new my-draft-post.md file and save it in the _drafts folder. Then as you're working on your draft post, you can run the following command from your terminal:
jekyll s --draftsThis works much like the jekyll s command we saw earlier, except the --drafts flag also parses any posts you have in the _drafts folder and displays them on your blog so you can see what they will look like once they're published.
Once you have finished working on your draft post, rename it to yyy-mm-dd-my-post.md and move it to the _posts folder.
This is all great, but how do we now get this new post published on Netlify? Well, dear reader, we do the same git push as we did before:
git add *
git commit -m "Pubished new post"
git push
As you can see though, the commit message has changed this time. This will help you when looking back at any past commits so you know what they were for. My advice is to always be descriptive with these commit messages.
Once you've run the git push command, Netlify will see that push and will trigger another build. A few minutes later your new post should be live on the public version of your site.
Editing other content
The process of editing other content, like pages or CSS is very similar to the process above. All you need to do is open the file you want to edit, for example, about.md or custom.css, make the changes you want to make, then run the 3 git commands above, once again changing the commit message to something descriptive.
When the push completes, Netlify will see these changes and trigger another build.
Skipping a build
On the free version of Netlify, your account is limited to 300 build minutes per month. So let's say it takes 2 minutes for Netlify to build and deploy your site; this means you are allowed to do 150 builds over the course of a month.
That's pretty good, and I've never been close to hitting that limit. However, there may be times when you want to commit something to your GitHub repository, but don't want to trigger a Netlify build. After all, you might as well save those minutes if you can.
A good example of this is adding a draft. Maybe you saved a new draft in _drafts from your laptop and you want that draft to be available on your desktop so you can continue working on it.
All you need to do is add a flag to your commit message and Netlify will skip the build. So when you run your 3 git commands to add your new draft, you append your commit message with [skip netlify]. This will tell Netlify to ignore this commit and a build will not be triggered. Here's an example:
git add *
git commit -m "Added draft [skip netlify]"
git push
Then, once you're back on your desktop, cd into Your local GitHub repository, run a git pull and your new draft will be pulled down without wasting any Netlify build minutes.
That's a wrap!
As Bugs Bunny once said - that's all, folks! We have come to the end of this rather long guide on how to build a Jekyll site using Simple.css and Netlify. This is by far the longest post I have ever written - at nearly 7,000 words, but I wanted to be as verbose as possible so that the barrier for entry is low. Some technical knowledge is always required when working with static site generators, like Jekyll. So please bear that in mind if you decide to give this a go.
I really hope you have learned something from this post. If you have published a site using this guide, please do send me a link - I'd love to see what you guys come up with.
This has been a mammoth amount of work to produce, so if you did find it useful, please do consider buying me a coffee to say thanks - God knows I need one after this!
By the way, if you're wondering, the site we just built together gets pretty good scores on Lighthouse tests.

Until next time folks; Kev, out.
If you want to know how to setup a site using Simple.css and Hugo instead of Jekyll, check out this great guide by Bart De Vries.