Making A Light Website - 02 Design
| 9 min read
After going though the last post in the Making A Website series we went through the basics of getting a light website up and running. In this post we will looks at adding to our home page some more. But first, let's look at the challenges I set for you in the last post:
Challenge 1: see if you can work out how to add a bulleted list to your webpage.
Did you work this one out? In HTML a bulleted list is called and unordered list, which uses the <ul> HTML tag. So to add a list, you need to add the following HTML code to your index.html file:
<ul>
<li>This is item #1</li>
<li>This is item #2</li>
<li>This is item #3</li>
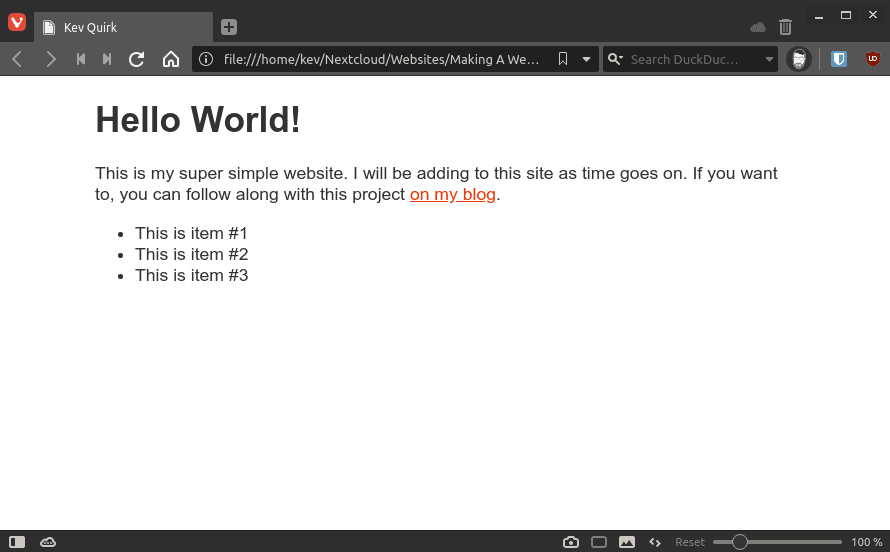
</ul>Challenge 2: See if you can change the colour of hyperlinks to red.
This one is a CSS challenge. Did you work it out? As I mentioned in the last post, hyperlinks use the <a> tag in HTML. So to make a hyperlink the colour red, you need to add the following CSS code to your style.css file:
a {
  color: red;
}
If you managed to work out how to complete these 2 challenges, well done! Let's see what out website looks like with an unordered list added and hyperlinks set to red:
Colour Palette
One of the first things you need to do when making a website is to decide on the colour palette you wish to use for the site's theme. There are some online colour palette generators, which are generally pretty good. For this site, we're looking at simplicity, so we're going to use the same colour palette I use for this site:
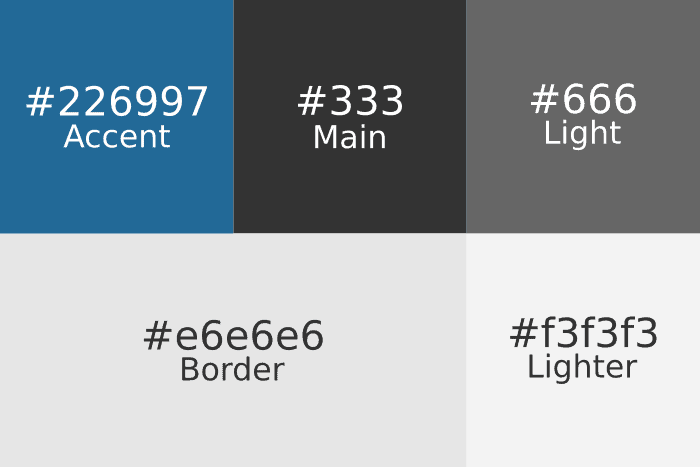
A light website needs a light theme, right?
Now we have identified the colour palette we're going to use for our light website, we need to add some CSS. We could add the colours for each piece of CSS code manually, but if we decided to change the colour palette at a later date, it would mean lots of code changes.
Instead we're going to use variables. Variables allow us to set the colours in one place, then reference them throughout the CSS. So if we decide to change the colour palette later on, we only need to update the variables in one place and all CSS using those variables will be updated.
First we need to articulate our variable at the top of the style.css file. We do that with the following CSS code:
/* Global variables for changing colours across the site */
:root {
    --accent: #226997;
    --main: #333;
    --light: #666;
    --lighter: #f3f3f3;
    --border: #e6e6e6;
    --bg: #fff;
}
Then we can change the colours we setup in the body section of our CSS in the last post. To do this, simply change the colour from #fff to var(--bg);. Our body CSS should now looks like this:
/* Format the main body of the website */
body {
    background: var(--bg);
    color: var(--main);
    font-family: sans-serif;
    font-size: 1.1em;
    display: block;
    text-align: left;
    width: 800px;
    margin: 0 auto;
}
Now our background colour is set to white because we're using the --bg variable for the body's background, and our text is still grey because we're using the --main variable for that.
You may have noticed that the font-size entry has been added too. This is just to make the text a little bigger and therefore a little easier to read. Feel free to change this to whatever you like, or remove it completely. Personally, I like large text. 🙂
Formatting Hyperlinks
Next we're going to look at formatting how hyperlinks are displayed to make them fit in with our colour palette. Again, we're going to format them in the same way I do on this website.
By default hyperlinks are underlined. I don't do that with my theme, so we're going to change the colour to --accent and override the default so links are not underlined. We do this be adding the following code to our style.css file:
/* Format hyperlinks */
a, a:visited {
    color: var(--accent);
    text-decoration: none;
}
In the CSS above, we have both a and a.visited set. By default, when you have already clicked a link, it turns purple. We want all of our links to be a consistent colour. Adding a.visited ensures this happens.
What we want to do now is add an animation for when someone hovers over the link. In this case we want to underline the text when the mouse cursor hovers over a link. We do this by adding the following CSS code:
a:hover, a:focus {
    text-decoration: underline;
}
Again, we have more than one attribute called out. a:hover is what happens when the mouse hovers over a link. a:focus is when someone clicks the link. If we didn't have this, the underline would disappear when someone clicks their mouse to follow a link.
Banner Image
The next thing we're going to do is add a banner image to our website. When making a website, adding images can really add to the aesthetic of the design. But use them sparingly as they can be very large and the larger your website is, the longer it will take to load. Remember, we want a light website.
Ok, we're going add a simple banner image to our site and format it slightly with some CSS. To add an image to our index.html file, we need to use the <img> tag.
To do this, add the following HTML code above the <h1> #
<img class="home-banner" src="images/home-banner.png" />The class of this image is home-banner. Classes allow us to apply CSS formatting to that image only, without affecting all of the images on the entire site.
All we need to do now is create a folder in Neocities called images and upload the banner image to that folder. This is because the source (or src) is images/home-banner.png. You're telling the HTML that your banner image is called home-banner.png and it's located in the images folder.
So let's add some basic styling to the banner-image class. Head over to your style.css file and add the following CSS code:
/* Format the banner image on the home page */
img.home-banner {
    padding-top: 60px;
    padding-bottom: 20px;
}
All this CSS will do, is add a little bit of white space at the top and bottom of our new banner image. Here is what our light website now looks like with the banner image added:
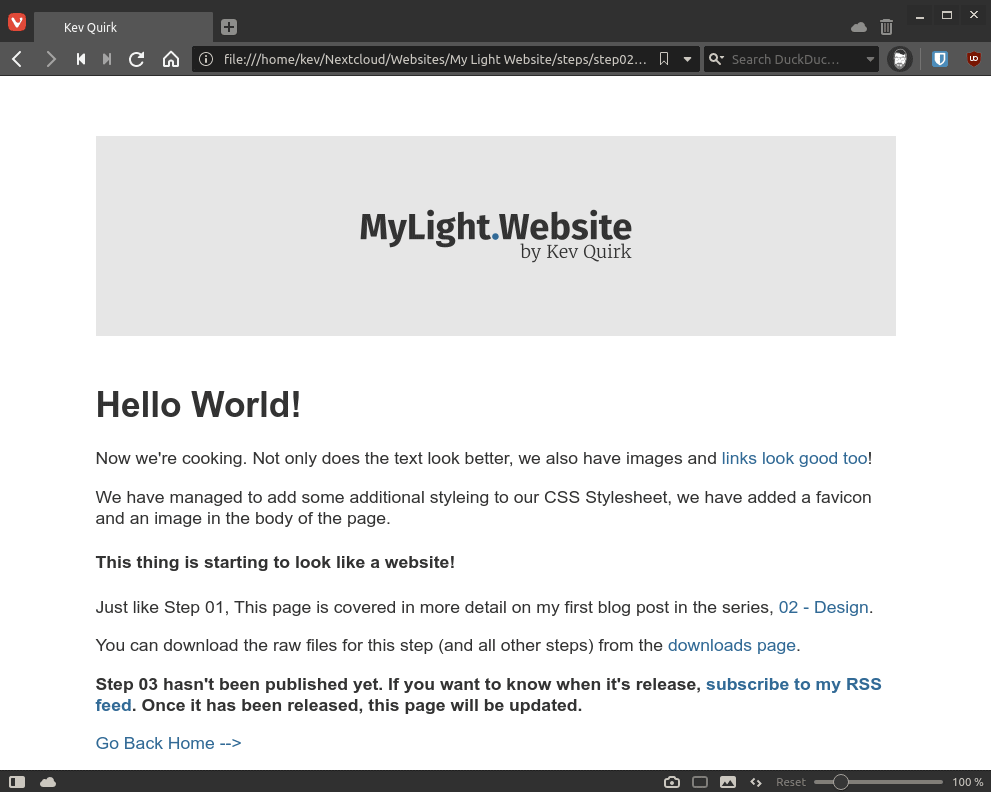
This is starting to look pretty cool, but it's still a very light website!
Adding a Favicon
If you look at the tab in the image above, it says Kev Quirk in the tab's title, but it has no icon next to it. However, when you look at the tab on this website, not only does it say Kev Quirk, it also has a grey and white KQ icon with it. That's my favicon.
Let's add a simple favicon that is in-keeping with the rest of our theme. To do this, we need to add the following line of HTML to <head> section of our index.html file:
<link rel="shortcut icon" href="images/favicon.png" />Like the banner image, our favicon file is called favicon.png and it is located in the images folder we created earlier. Now that we have added the code for the favicon to index.html let's take a look at the site:
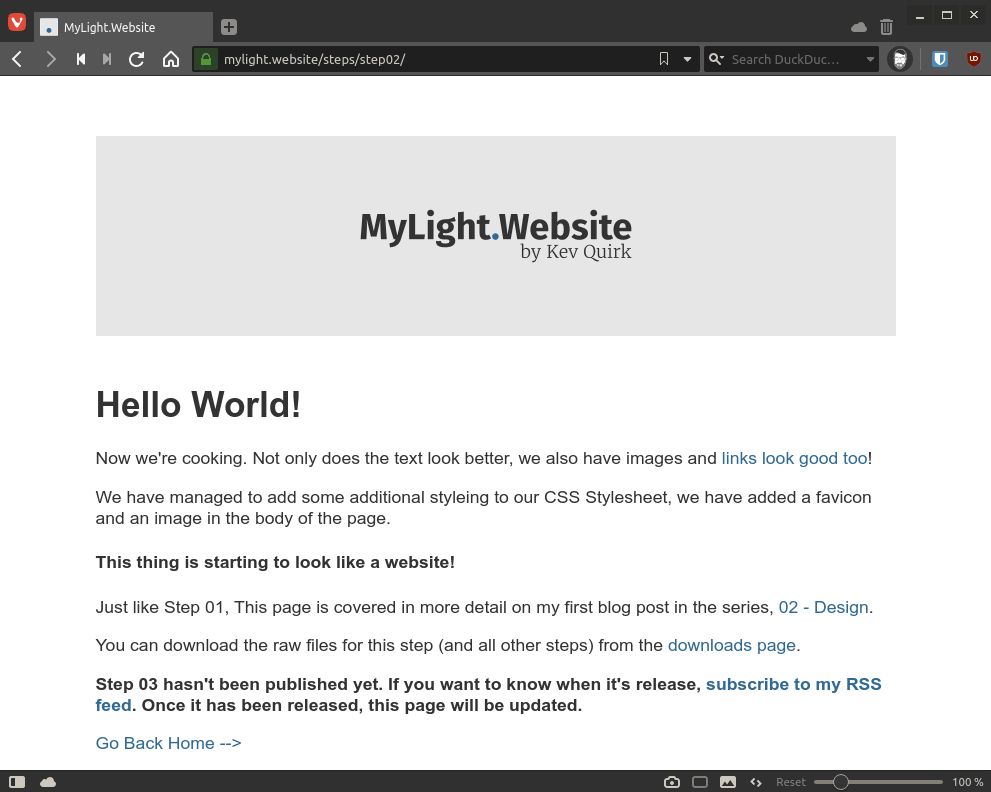
Much better! We now have a nice blue & grey favicon that matches the banner image on our site. A light favicon to go with a light website.
Putting It All Together
So we have made quite a few changes to both the index.html and style.css files. If you put all the changes together here is what the files should currently look like:
index.html
<!DOCTYPE html>
<html>
<head>
<link href="style.css" rel="stylesheet" type="text/css" media="all">
<link rel="shortcut icon" href="images/favicon.png" />
<title>mylightwebsite.kevq.uk</title>
</head>
<body>
  <img class="home-banner" src="images/home-banner.png"></img>
  <h1>Hello World!</h1>
  <p>Now we're cooking. Not only does the text look better, we also have images and <a href="#">links look good too</a>!</p>
  <p>We have managed to add some additional styleing to our CSS Stylesheet, we have added a favicon and an image in the body of the page.<p>
  <h4>This thing is starting to look like a website!</h4>
  <p>Just like Step 01, This page is covered in more detail on my first blog post in the series, <a target="blank" href="/making-a-website-02-design">02 - Design</a>.</p>
  <p>You can download the raw files for this step (and all other steps) from the <a target="blank" href="/downloads.html">downloads page</a>.
  <p><b>Step 03 hasn't been published yet. If you want to know when it's release, <a target="blank" href="/feed">subscribe to my RSS feed</a>. Once it has been released, this page will be updated.</b></p>
  <a href="/">Go Back Home --></a>
</body>
</html>
style.css
/* Global variables for changing colours across the site */
:root {
    --accent: #226997;
    --main: #333;
    --light: #666;
    --lighter: #f3f3f3;
    --border: #e6e6e6;
    --bg: #fff;
}
/* Format the main body of the website */
body {
    background: var(--bg);
    color: var(--main);
    font-family: sans-serif;
    font-size: 1.1em;
    display: block;
    text-align: left;
    width: 800px;
    margin: 0 auto;
}
/* Format the banner image on the home page */
img.home-banner {
    padding-top: 60px;
    padding-bottom: 20px;
}
/* Format hyperlinks */
a, a:visited {
    color: var(--accent);
    text-decoration: none;
}
a:hover, a:focus, a:active {
    text-decoration: underline;
}
What Next?
That's it for this Making A Website post. We're making really good progress. We now have a website that has the beginnings of a theme, a colour palette and some custom CSS to pull it all together.
In the next post in this series we're going to be looking at adding additional pages and a menu. At the end of this series, your website should look something like mylightwebsite.kevq.uk.
As usual, if you want to download the raw files for this series, you can do so here. I will update the page after every post with latest website files.
Subscribe for more!
You don't have to keep coming back here to read my latest waffle. There's a couple of way to subscribe to receive updates whenever I publish new content.