How To Install Nextcloud On A Synology NAS
| 14 min read
I previously published a post on how to setup Pi-Hole on a Synology and since then a number of people have asked for a guide on how to install Nextcloud on a Synology. After lots of tinkering, this post is the result.
I've talked about Nextcloud vs Synology before, and why I think Synology is the better choice for a home server. However, by using this guide you don't need to choose - you can install Nextcloud on your Synology NAS!
This is likely to be another long post, so let's get cracking shall we?
Setup DNS
Once Nextcloud is all setup and working on your Synology NAS, you will probably want to access it via a nice URL, usually a subdomain like nextcloud.example.com. If that's the case, make sure you log into the DNS provider for your domain (this is usually the registrar you registered the domain with) and configure an A record that points to the public IP address of your Synology NAS.
By doing this first we're giving the DNS a chance to propagate, so when we come to setup public access later on, we won't encounter any DNS issues and we should have the Let's Encrypt certificate issued on our first attempt.
More on that later though. Once you have the DNS record configured, head over to your Synology NAS, as there's some work for us to do there next…
Install packages
The first thing you're going to need to do is login to your Synology and install a few packages (if you don't have them installed already). The packages you need to install are:
- Synology Web Station
- Apache HTTP server - make sure you install the latest version. At the time of writing this post, that is
2.4. - PHP - again, go for the latest version available. At the time of writing, that is
7.4. - MariaDB - you guessed it, get the latest version. At the time of writing, that is
10. - When you install MariaDB, you will be asked to set a password remember this password and make sure it's secure.
- Leave the port set to
3307. - phpMyAdmin - this package is optional, but will allow you to manage your MariaDB databases should you need to.
All of these packages are available from the main Synology repository, so you shouldn't have to do anything clever to get them installed. Just open up the Package Center and search for each package.
Configure Apache & PHP
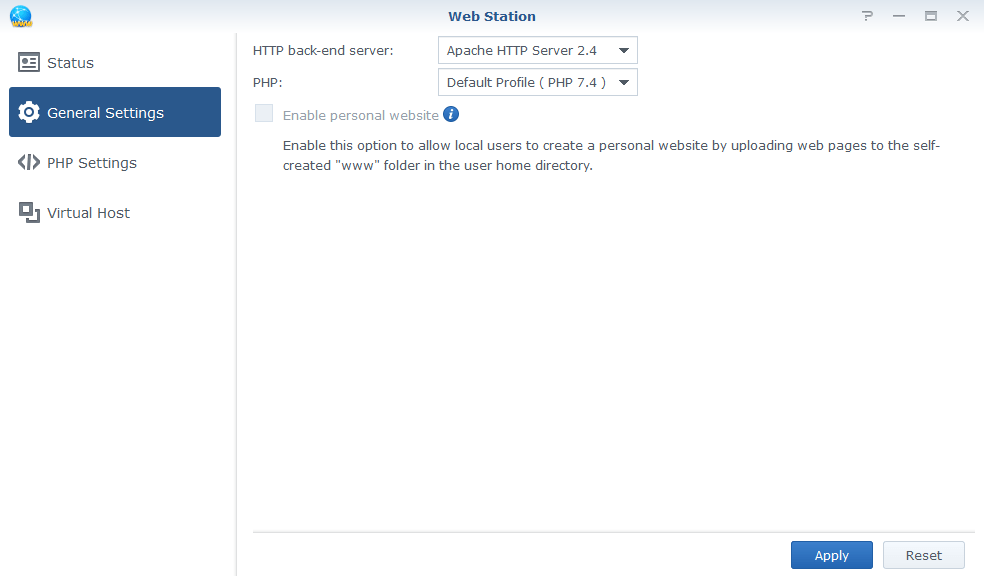
Now the pre-requisite applications are installed, you need to tell Web Station to use Apache & PHP. To do this, open up Web Station and go to the General Settings tab. Change the HTTP back-end server dropdown to be Apache and the PHP dropdown to be the version you just installed. Nextcloud runs on PHP, so if we don't do this, Nextcloud won't work.
Next, go into the PHP Settings tab, highlight the version of PHP you're using and click the Edit button. Under Extensions select everything. Then click on the Core tab, search for memory_limit and change it to 512M.
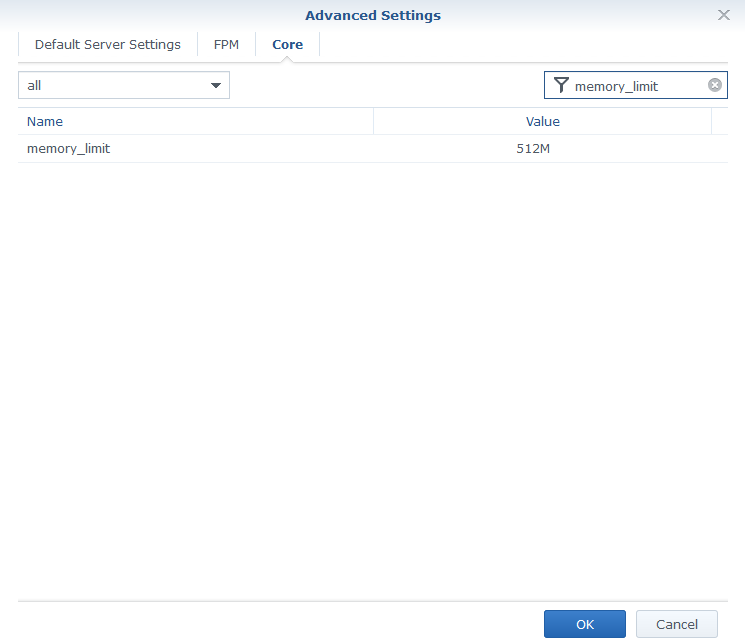
Finally, click OK to apply those configuration changes.
Enable TC/IP connections on MariaDB
The final thing to do in this part is to open up the MariaDB application and check the box that says Enable TCP/IP connection. This is needed so Nextcloud can connect to our database when we configure it later on.
Leave the port as 3307 and click Apply.
Enable SSH access & setup folders
You now need to enable SSH access to your Synology NAS so you can log into the command line of your Synology and configure some stuff (don't worry, there isn't much to do here).
To enable SSH access, go to Control Panel on your Synology and select Terminal & SNMP. Finally, check the Enable SSH service option. By default the port is 22, it's up to you if you want to change this.
I'd strongly recommend making sure the SSH port is closed on your router before doing this. Otherwise you will be opening up your Synology via SSH to the Internet. Bad times.
Before we hop over to the command line, we need to create a shared folder within Synology that will store all our Nextcloud data. So while still in Control Panel, head over to the Shared Folder tool and create a new shared folder.
Give the folder a name of nextcloud and set the Description to something like “This is where the Nextcloud data is stored.” For most people, the location will be volume1. Keep clicking Next on all other windows - you don't need to change any other options.
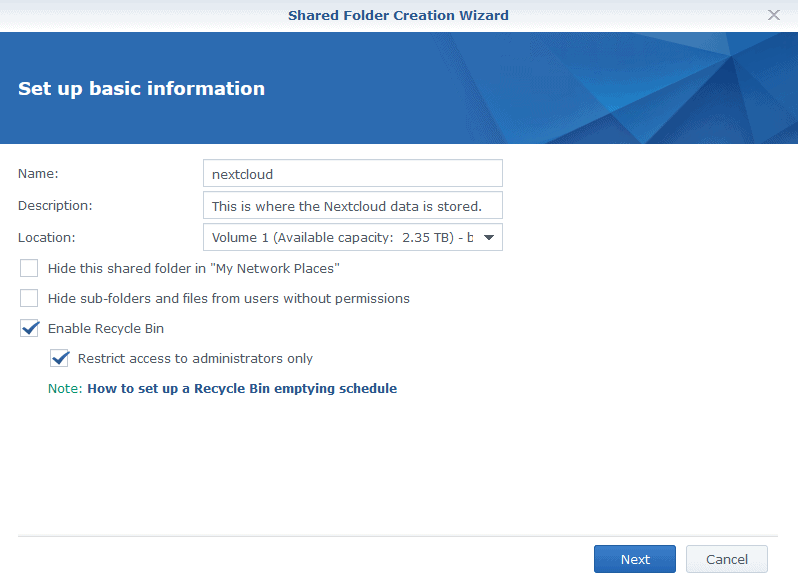
Once you have completed the shared folder wizard, click Apply. You will now be asked to set permissions. Leave everything default and click OK. We will set additional permissions from SSH in a second.
Time to SSH
Ok, we're done in the Synology GUI for the time being. It's now time to really get our hand dirty in the command line. Open your favourite command line tool and SSH into your Synology. You will be asked for your user password to login via SSH. If you set a custom port for SSH, you will need to express that in your SSH command with the -p flag.
So let's say my username is john, my internal Synology IP address is 192.168.0.10 and the SSH port is 2222, my SSH command will look like this:
ssh john@192.168.0.10 -p2222Once in, we need to elevate our privileges to root. To do this, run the following command (you will need to enter your password again):
sudo su -Now change directory into the Web Station directory:
cd /volume1/webThe command above assumes that your Synology is working from volume1. You can confirm this by opening the Storage Manager on your Synology to see what volumes you have configured.
Now let's create a directory that will store the front end web component of Nextcloud:
mkdir nextcloudBecause we have created this folder as root, we need to make the Web Station http user the owner of the nextcloud folder. We also need to change the folder permissions so http can access and manage the data in this folder. We do this with the following commands:
chown -R http:http nextcloud
chmod -R 0770 nextcloud
The 0770 permission we have just given to nextcloud allows for the http user and the http group to have read/write access and no one else. While we're here, let's give http access to the nextcloud shared folder we created earlier as well so it can write to that folder too:
chown -R http:http /volume1/nextcloud
chmod -R 0770 /volume1/nextcloud
At this point you may be confused as to why we have two different folders, both called nextcloud. Let me take a second to explain…
The shared folder we made (/volume1/nextcloud) is going to be used for our Nextcloud data only. So this folder will never be exposed to the internet. The web folder (/volume1/web/nextcloud) contains the website files for the Internet facing part of Nextcloud. By keeping the two directories separate, we make our Nextcloud configuration more secure.
Pulling down Nextcloud
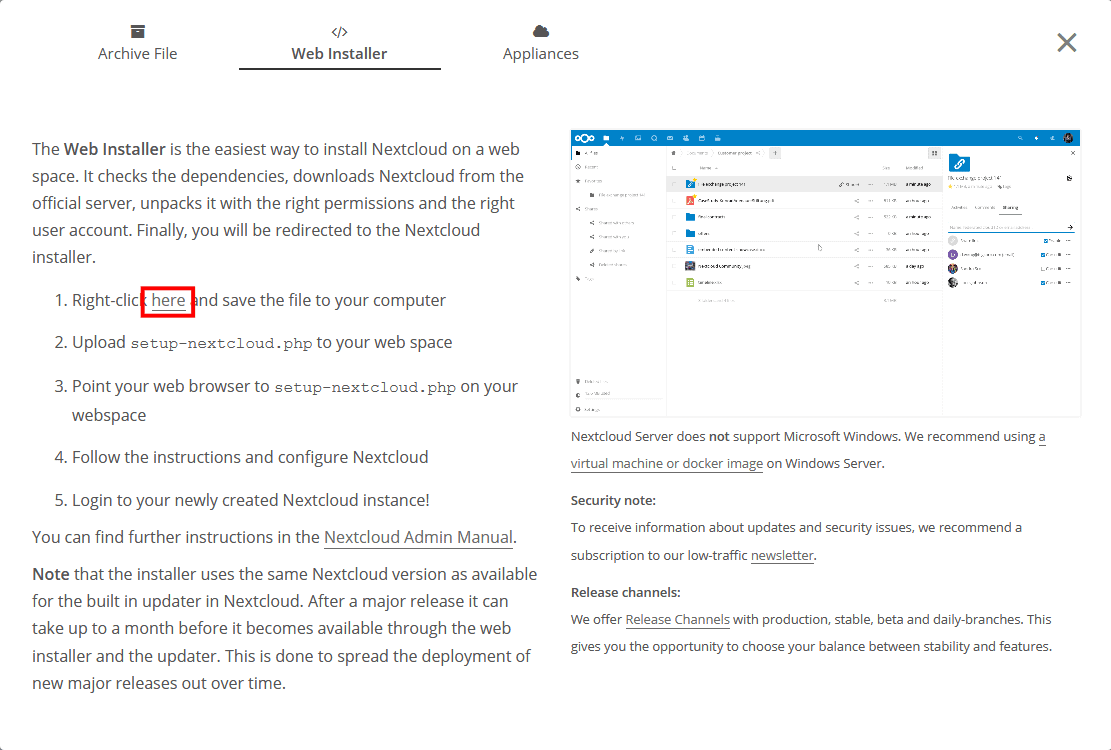
We're nearly finished in the SSH session. The last thing to do is pull down the Nextcloud Web Installer package. To do this, navigate to [https://nextcloud.com](), click on the Get Nextcloud button and select Server Packages.
A popup will now appear. Select the Web Installer tab. Right click the link on step 1 of the instructions (highlighted below) and select Copy Link Location. This will copy a link to the web installer file so we can download it to our Synology.
Back to the SSH session. Change directory into the nextcloud folder, then pull down the Nextcloud web installer:
cd nextcloud
curl -O https://download.nextcloud.com/server/installer/setup-nextcloud.php
Your Synology will now pull down the Nextcloud web installer. We're done with SSH for the time being, but leave the session open as we need to make one more change later on.
Setup Nextcloud
We're now ready to install Nextcloud on our Synology NAS. So, open up a browser and navigate to the following address:
http://<internal-nas-ip>/nextcloud/setup-nextcloud.phpSo if the internal IP address for my Synology is 192.168.0.10, the URL I would visit is
http://192.168.0.10/nextcloud/setup-nextcloud.phpAt this point you should see the Nextcloud setup wizard. Click the Next button to get started.
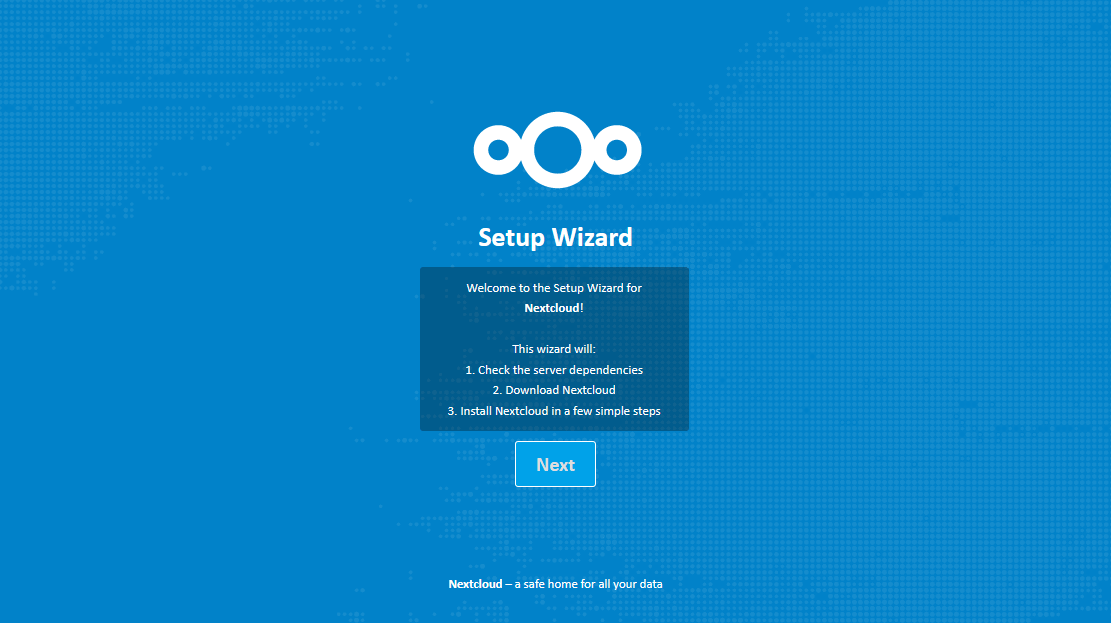
Nextcloud will then run a dependency check and because we enabled all the PHP extensions earlier, there should be no issues. In the field asking where Nextcloud should be installed, delete nextcloud and replace it with a single dot:

Click Next again to continue. This may take a minute or so, but be patient as Nextcloud is being installed. Once it's done, you will get a message telling you that Nextcloud is now installed.
Awesome. We now need to configure our database and data folders. So, click Next to continue.
Configure Nextcloud
There are a number of options to configure here. First things first, enter the username and password you want to use with Nextcloud. This will be the admin account, so make sure you choose a strong password.
Next, click on the Storage & database option to expand the configuration options. Under Data folder delete the contents and replace it with /volume1/nextcloud. This is the shared folder we created earlier.
By default, Nextcloud is configured to use SQLite, but that can cause all kinds of performance issues, so change this option to MySQL/MariaDB and fill in the details as follows:
- Username: root
- Password: The password you set when you installed MariaDB earlier
- Database name: This can be anything you like, let's go with
nextcloud - Delete
localhostand replace it with127.0.0.1:3307
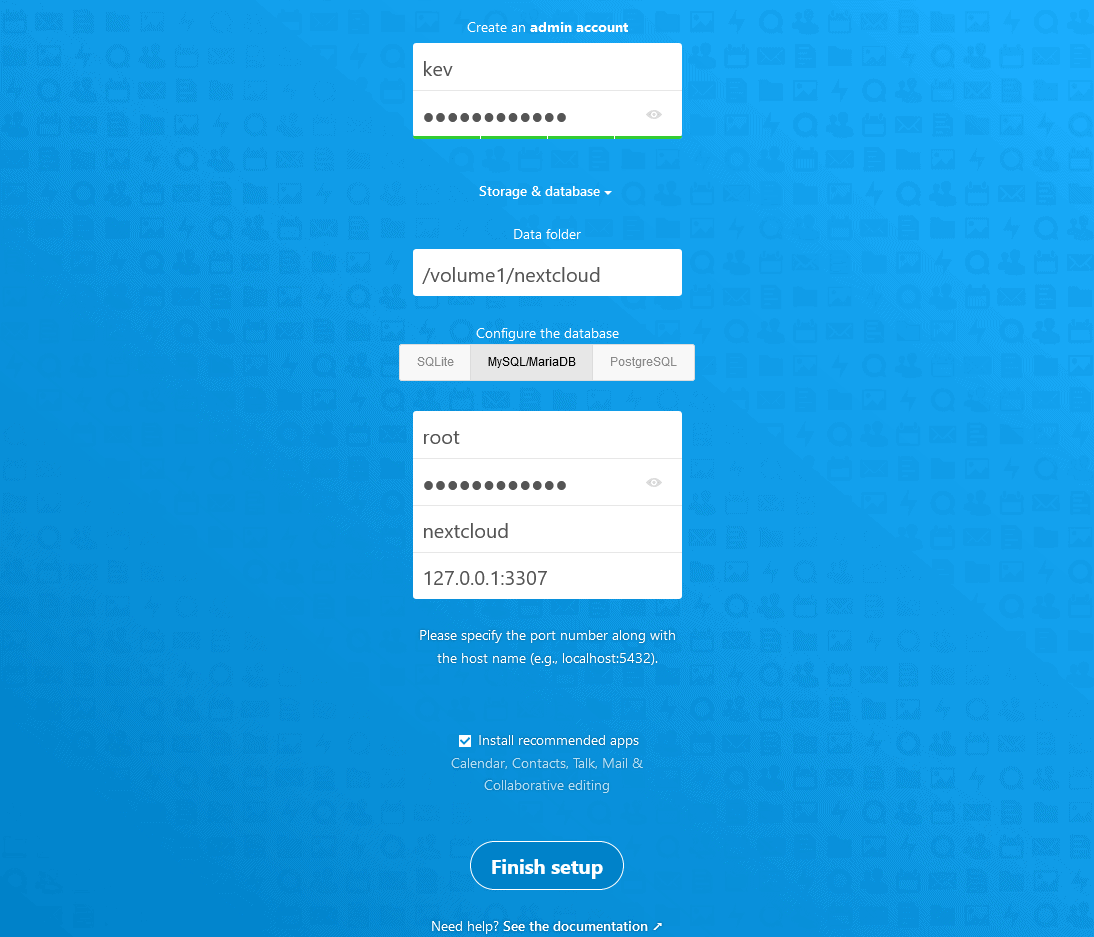
Finally, I'd recommend leaving Install recommended apps checked. Then click Finish setup. Once again this step may take a minute or so to complete. Don't worry, Nextcloud is doing a lot of work in the background to get stuff configured - it's normal.
At this point you MIGHT get a 504 error. Don't worry, Nextcloud has installed. This is just a weird bug in Nextcloud. Leave it for 5 minutes and refresh the page; you should then see the Nextcloud login page.
That's it! Nextcloud is now installed on your Synology NAS. We now need to configure your Synology so you can actually access Nextcloud from the Internet…
Configure external access
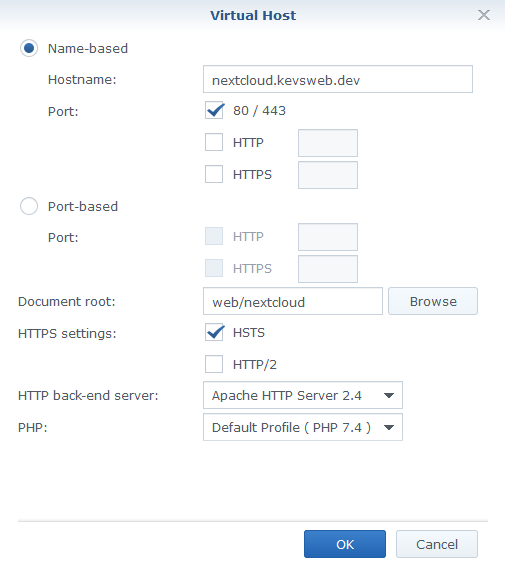
At this point we need to flip back to the Synology web interface so we can configure a new virtual host in Web Station. Open up the Web Station application and click on the Virtual Hosts tab. From here, click on the Create button to setup a new virtual host.
In this example, I'm going to use the nextcloud.kevsweb.dev sub-domain. So anywhere you see this domain listed, make sure you replace it with the sub-domain you intend to use for Nextcloud.
In the virtual host window, select the Name-based option and enter your sub-domain as the hostname. Keep Port checked; this means the virtual host will use the standard HTTP/HTTPs ports, so you won't have to append your Nextcloud URL with a port number. If you prefer to set a custom port for Nextcloud, just change the settings as you see fit.
Next, set the Document root to web/nextcloud.
Finally, under HTTPS settings, check the HSTS option. Set the HTTP back-end server dropdown to Apache and the PHP dropdown to the version you installed earlier. Once you're done, the virtual host config window should look something like this:
Click OK and you will get a message relating to assigning permissions to this virtual host. Click Yes on this message.
Configure SSL certificate
If you were to visit your Nextcloud instance using your URL now, you browser is likely to complain about the lack of SSL. So we need to enable SSL so that we can use HTTPS for Nextcloud - this is so Nextcloud stay secure and doesn't leak your password to the world.
Still in the Synology web interface, open up the Control Panel and select Security, then Certificate. Click on the Add button to create a new certificate for Nextcloud.
- In the first window make sure Add a new certificate is checked and click Next.
- On the second window, give the new certificate a description like “Nexctloud certificate”, select Get a certificate from Let's Encrypt and click Next again.
- On the third window, enter the domain name you want to use, in my case that's
nextcloud.kevsweb.devand an email address. Leave the Subject Alternative name field blank. - Finally, click the Apply button and assuming the DNS changes you made earlier have propagated, the certificate should be issued successfully.

Still in the certificate tab, click on the Configure button. In the popup that appears, look for the Nextcloud virtual host that you created earlier - this will be shown as a domain name - and change the certificate from the default option to the Nextcloud certificate you just created.

Finally, click OK to apply those changes. Now if you visit your Nextcloud instance in your browser, you should see a valid certificate and no warning message. Instead, you will now get an Untrusted Domain error message similar to this:
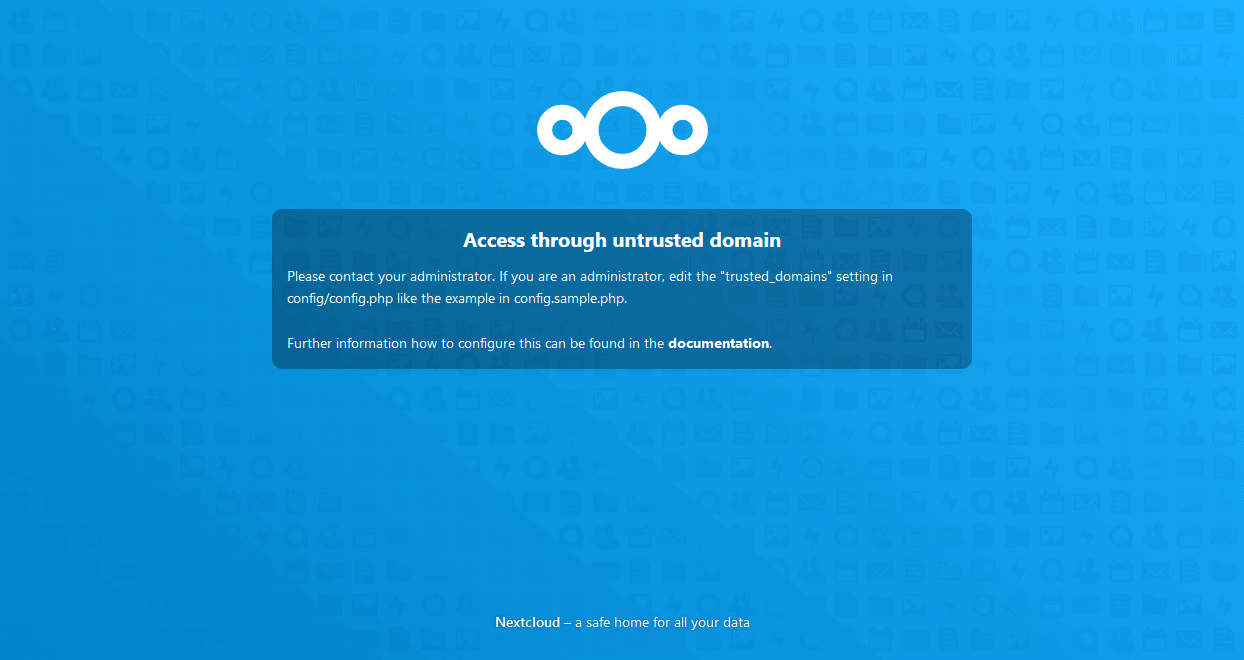
Remember I told you earlier there's something else we need to do to in the SSH session? Well, this is that thing. So flip back to your SSH session, make sure you're still logged in as root, change directory to /volume1/web/nexctloud/config and edit the config.php file.
I personally prefer to use nano to edit files on the command line, but it's not installed on Synology by default. If you want to install nano, follow this guide.
Once you're editing config.php, look for a section of the config file that looks like this (replacing the example IP address with your own):
  array (
    0 => '192.168.0.10',
  ),
To add our domain as a trusted domain in Nextcloud, add a new line so the config file looks like this:
  array (
    0 => '192.168.0.10',
    1 => 'nextcloud.kevsweb.dev',
  ),
Save config.php and exit the file. You can now logout of the SSH session. If you head back to your browser and refresh your screen, you should now be presented with the Nextcloud login screen:
Congratulations! You just installed Nextcloud on a Synology NAS.
You should now be able to login to your Nextcloud instance using the credentials your configured during the setup process.
Conclusion
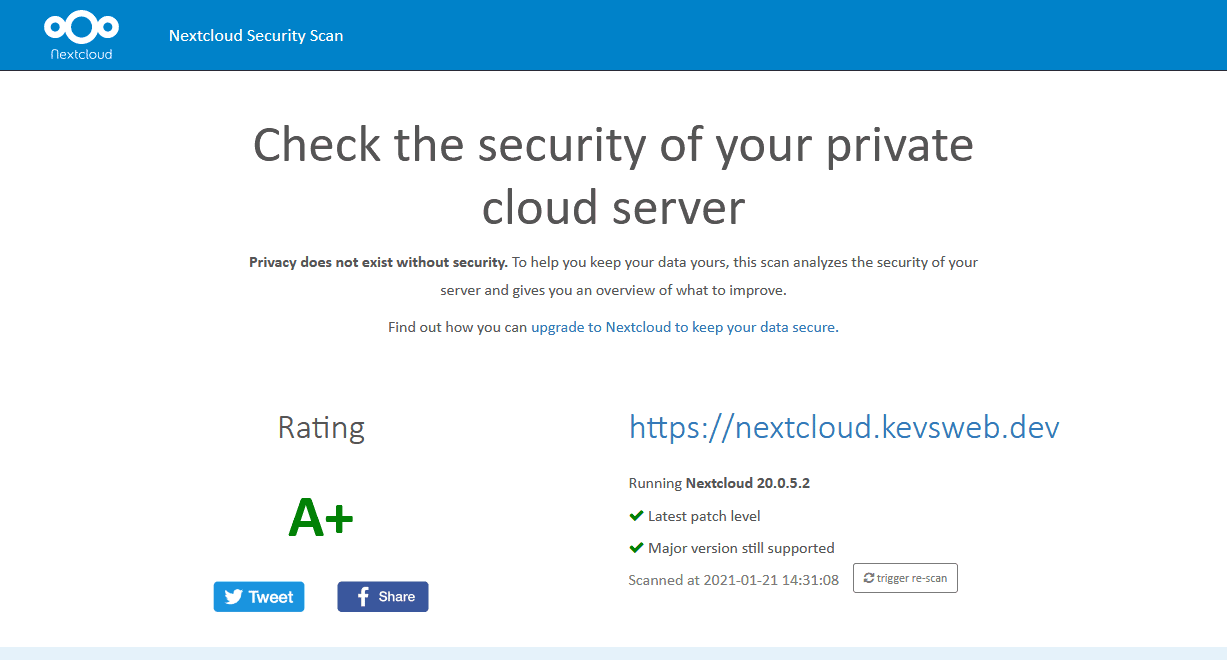
By following this process you should now have a fairly secure Nextcloud install running on your Synology. If you want to test the security of your instance, head over to the Nextcloud security scan tool to scan your new instance. You should get an A+ rating (report for my test server).
I was considering writing this tutorial using Docker, rather than a non-containerised version. But it seems that not all Synology devices have Docker available to them, so I decided this would be a more accessible option. Plus, it should be lighter on resources than running a stack of Docker containers.
I hope you found this post useful. Just like my recent how to build a Jekyll site post, this has been another big post with lots of work gone into it. If you have found it useful, please consider buying me a coffee to say thanks - I really would appreciate it. ?
I think this is enough writing for one day. So until next time folks; Kev, out.
Subscribe for more!
You don't have to keep coming back here to read my latest waffle. There's a couple of way to subscribe to receive updates whenever I publish new content.