How I Manage Images in Jekyll
| 8 min read
My Fosstodon pal, Ru Singh, was asking about managing images with static sites recently, so I thought I'd write about how I manage my Jekyll content.

Ru, I get it, managing and inserting images into a static site can be a pain. I've created my own workflow for managing images and other content on my site. Here's how it all works...
The problem
The problem as I see it is two fold. Firstly, inserting images using HTML is a pain, and there's no real way of doing anything except adding an alt attribute using Markdown.
What if you want to add a caption to the image? Or a class? Or make it lazy loading? You're fresh out of luck if you want to use Markdown, so you will have to revert to good old HTML.
If I want to add an image with a caption, some alt text and lazy loading enabled, here's the HTML I'd need to add:
<figure>
<img src="/_assets/images/image.jpg" alt="My image" loading="lazy">
  <figcaption>This is my image</figcaption>
</figure>
I'm sorry, but I do not have the patience for all that jazz everytime I want to add an image to a post. Hell no!
The other problem
Oh yeah, I mentioned two problems didn't I. Well, the other problem is managing the actual media library.
If you use a CMS like WordPress, you have a lovely media manager where you can easily search your library for images and insert them into posts. It's a fantastic experience.
But we have no such luck with static sites. Not unless we use a static site CMS like Forestry or NetlifyCMS. Instead, we just have a folder on our operating system's file browser that's full of images.
That's not a great experience, really.
The solution for inserting images
I use a MacBook Air as my main machine, and using the MacOS Automator and Jekyll's Includes feature, I've found a nice little workflow for inserting images in my posts.
Jekyll Includes
First, let's take a look at Jekyll Includes. When inserting an image, I could type out all the HTML like I showed above. Or, if I only want to add a basic image with an alt attribute, I could use Markdown, like this:
Now, let's say I want to add a caption to the image. This is impossible to do in plain old Markdown, so I came up with a workaround. What I do is this:

*My image*This would then be rendered as the following HTML:
<p><img src="My image" alt="/_assets/images/image.jpg">
<em>My image</em></p>
So I then take the italic text that's below my image, yet inside the same <p> tag and I format it with CSS to look the same as a proper figcaption:
img+em,
figcaption {
  font-size: 1rem;
  font-style: normal;
  display: block;
  text-align: center;
  margin-top: -1rem;
}
But what about lazy loading and classes?
Ok, so that's my little workaround for figcaption, but what about adding a class to an image, or making an image lazy loading?
Lucky for us Jekyll supports Kramdown which is Markdown with some extra bells and whistles.
So if I want to add a class of full-bleed to my image and make it lazy loading too, here's what I would do to my Markdown image from earlier:
{% raw %}
{: .full-bleed}
{: loading="lazy"}
*My image*
{% endraw %}With the resulting HTML looking like this:
<p class="full-bleed">
<img src="My image" alt="/_assets/images/image.jpg" loading="lazy">
<em>My image</em></p>
All these squiggly brackets, colons and dots are getting confusing though, right? That's a lot to remember and frustrating to type out. So what I did is add two Includes to my Jekyll site. These stop me having to type all that gubbins every time I want to add an image to a page/post.
Enter the Includes
Includes are snippets of HTML that can be included anywhere in the site with a little bit of Liquid syntax. Here's what my img.html Includes file looks like:
{% raw %}
{{=<% %>=}}<img alt="{{include.alt}}" loading="lazy" src="/_assets/images/{{include.src}}" />
<em>{{include.caption}}</em>
{% endraw %}
What I can then do is add the following Liquid syntax to any post or page to add an image with lazy loading already enabled, an alt attribute and an optional caption.
{% raw %}
{% include img.html src='image.jpg' alt='My image' caption='My image' %}
{% endraw %}
At build time, Jekyll will parse this piece of Liquid syntax and inject the appropriate bits of info into the HTML within my Includes file, and hey presto! We have an image.
If I don't want a caption, I just remove that from the Liquid syntax and it will be ignored at build time.
But Kev, that's still a fairly complicated string of text to type out every time you want to embed an image into a post!
You're absolutely right, folks. That's where we need...
MacOS Automator
What I then did was create a new Automator Quick Action that types out that string of text for me. Here's how:
- Open the Automator app on your MacOS desktop.
- Select Quick Action from the popup to create a new one.
- Select Run AppleScript from the available list of actions.
- Make it look like the image below (script pasted further down).
- Save it.
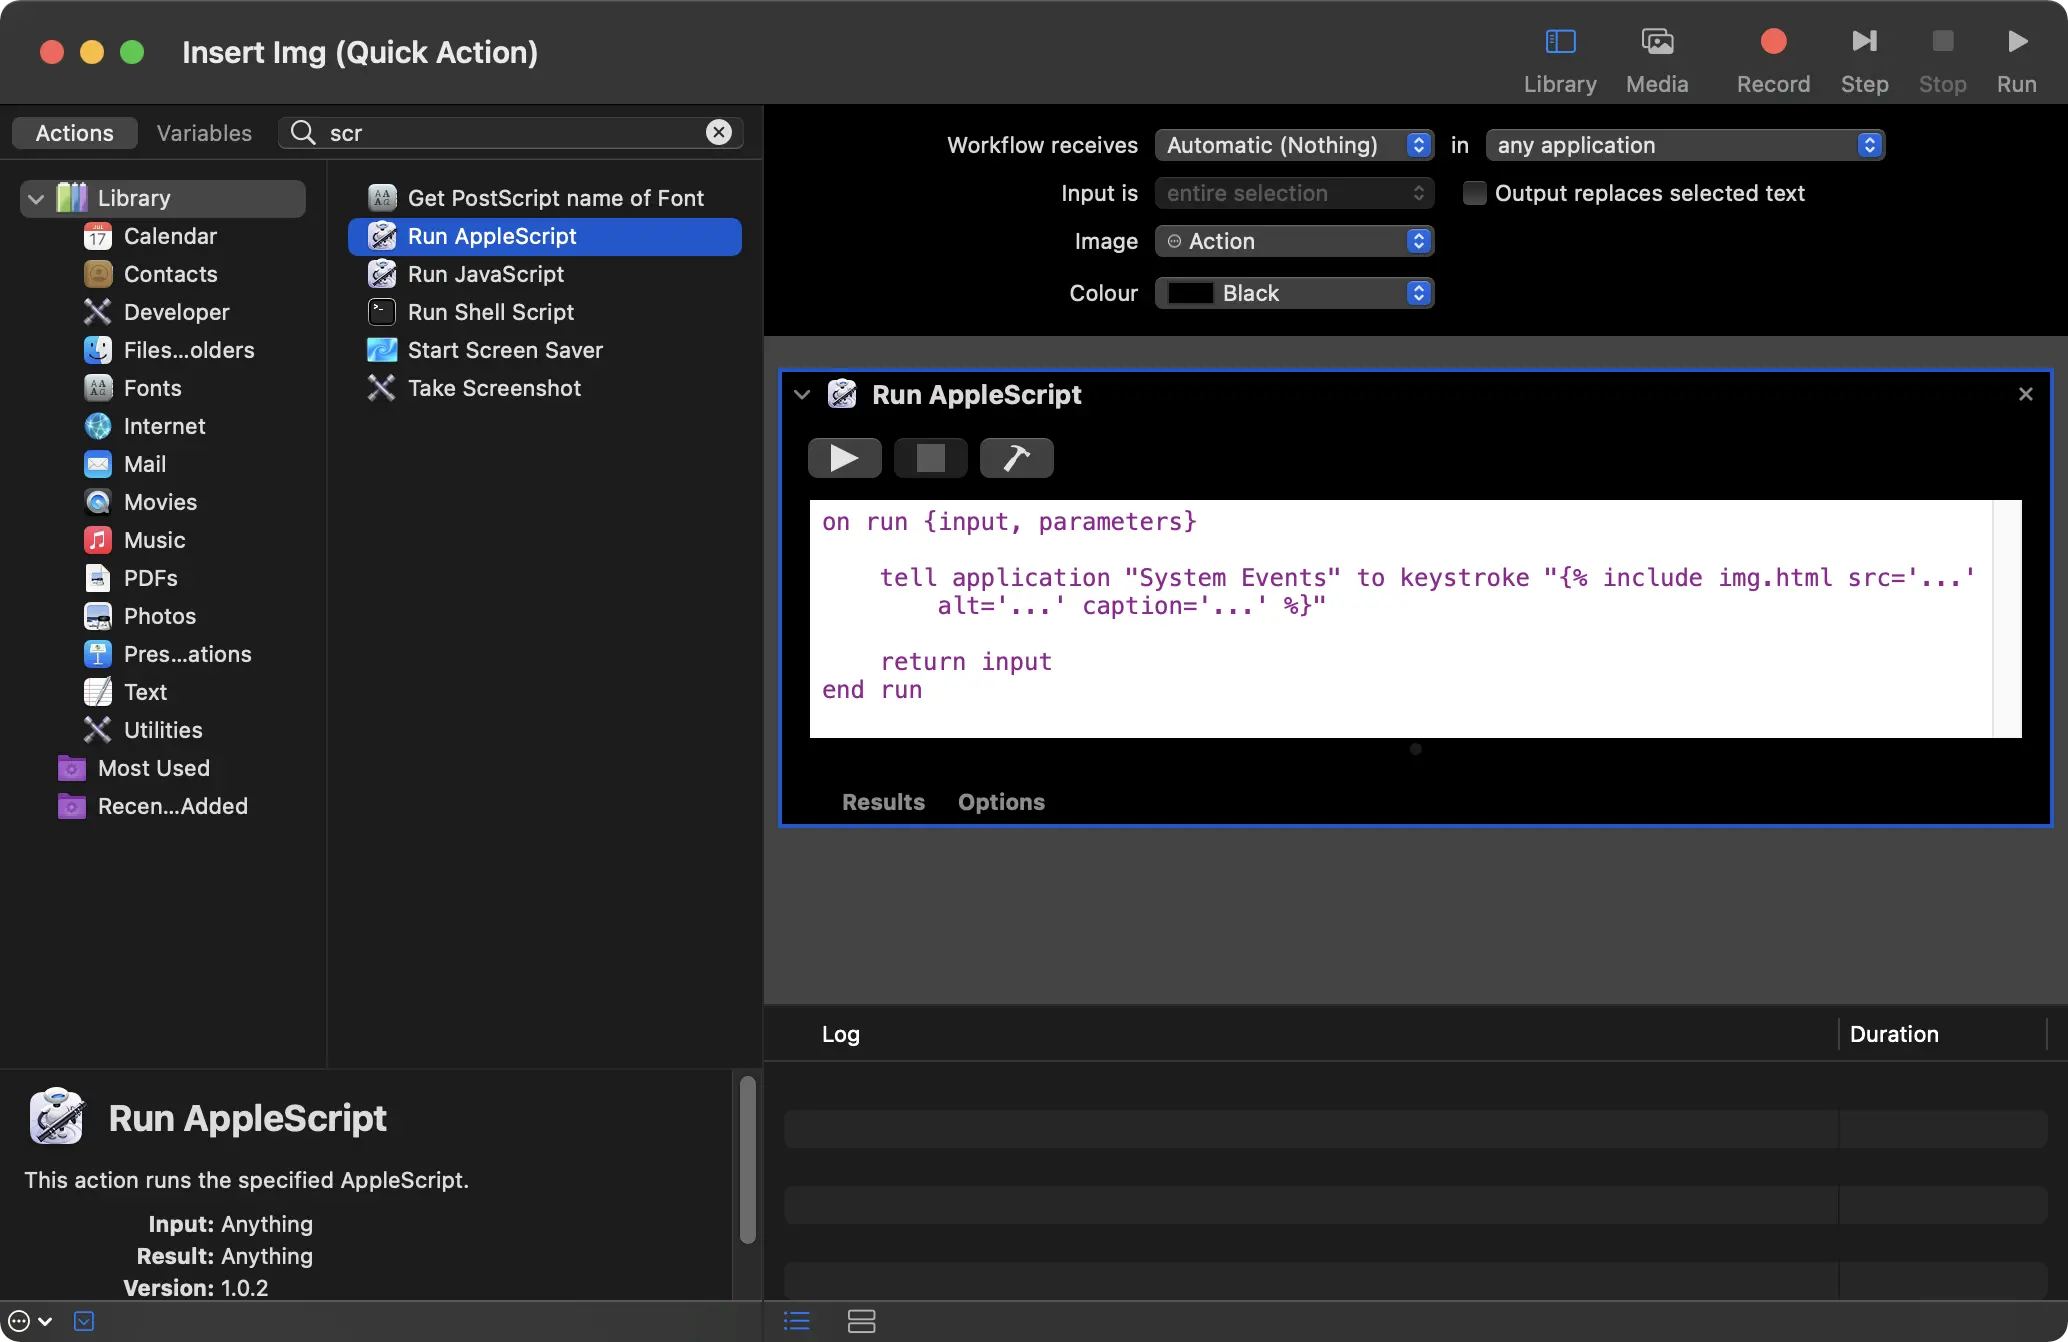
{% raw %}
on run {input, parameters}

    tell application "System Events" to keystroke "{% include img.html src='...' alt='...' caption='...' %}"

    return input
end run
{% endraw %}
Add a keyboard shortcut
The final step in getting this setup is to add a keyboard shortcut so that I can easily add the string of text anywhere within MacOS. To do that:
- Go to System Preferences, then Keyboard and click on the Shortcuts tab.
- Select Services from the left-hand pane and find the Quick Action you just made.
- Click on the Quick Action and a button should appear to Add Shortcut. Click it.
- Use the keyboard to type whatever keyboard shortcut you want to use for this Quick Action.
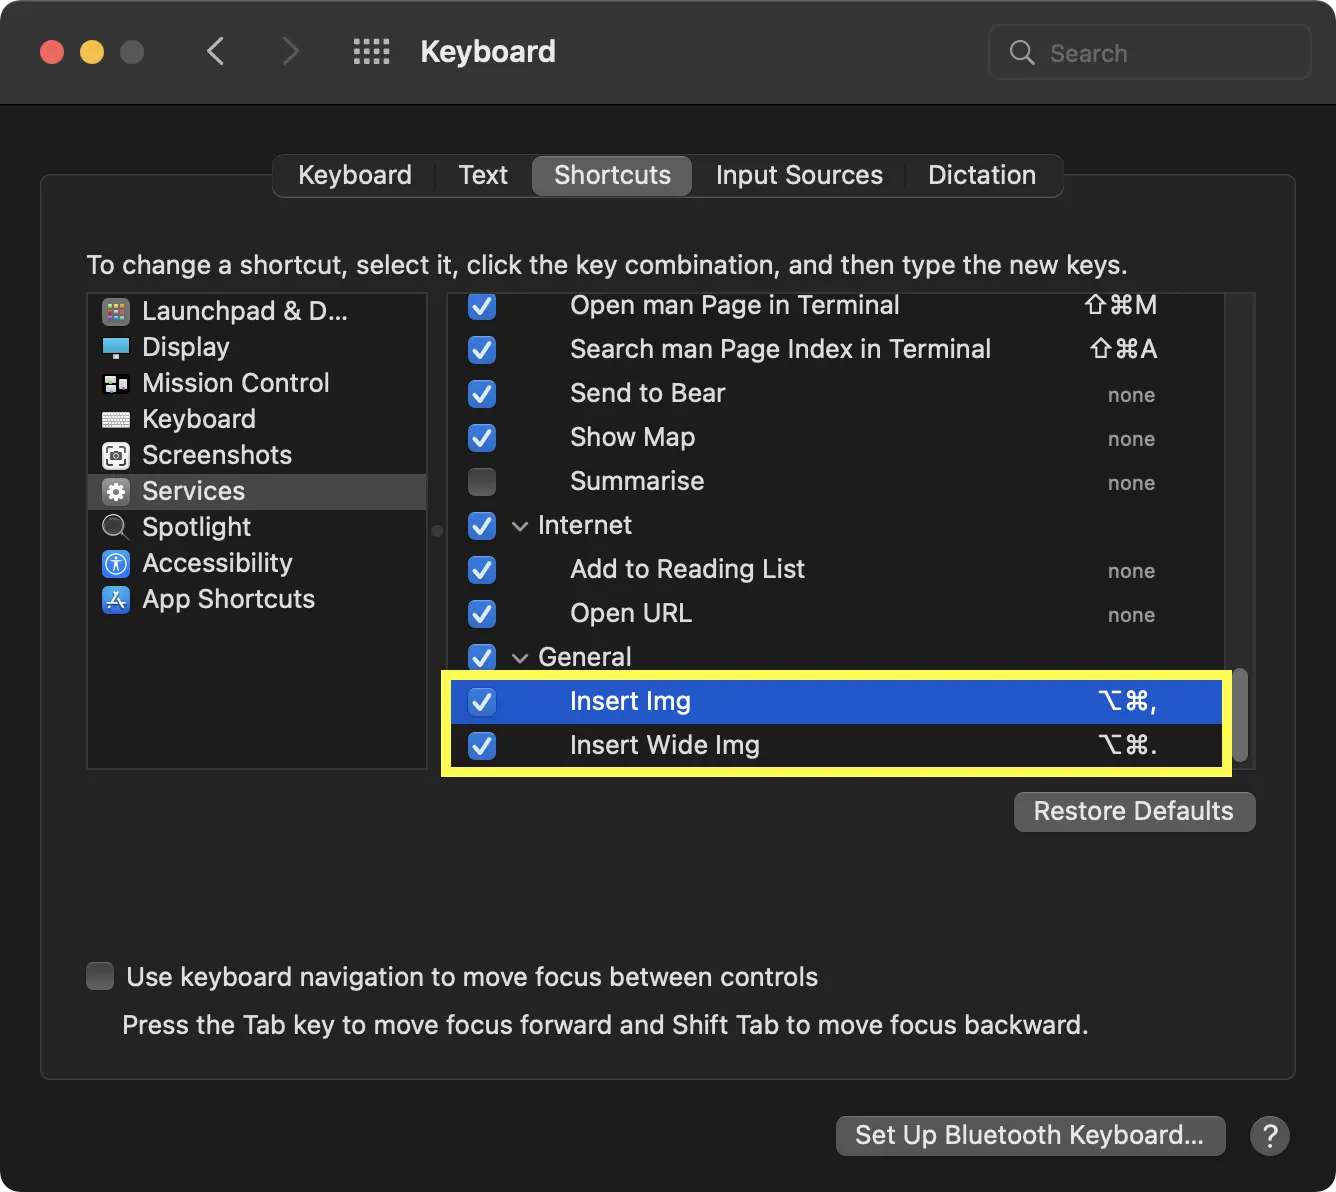
That's it. Done! Now whenever I hit the keyboard shortcut I chose, MacOS will add the Liquid template ready for me to fill in to get an image going. All I need to do is delete the three dots and replace them with the appropriate data.
For me, this process has made inserting images into posts extremely simple to do. It's still more of a hassle than something like WordPress, but I think it's as close as I'm ever going to get without using a static site CMS.
It's worth pointing out here too, that I also use Quick Actions to easily convert all my images to WEBP. If you want to know how I did that, check out this post by Bradley Taunt.
Managing files
That's one problem solved (I think), but what about the other problem of managing all those images that have been dumped into a single folder? And what about the hundreds of posts I have on my site too?
Managing images
This one is simple; I use Finder. By default the search feature in Finder searches the entire OS. But if you go into Finder > Preferences, then go to the Advanced tab, you can change that behaviour:
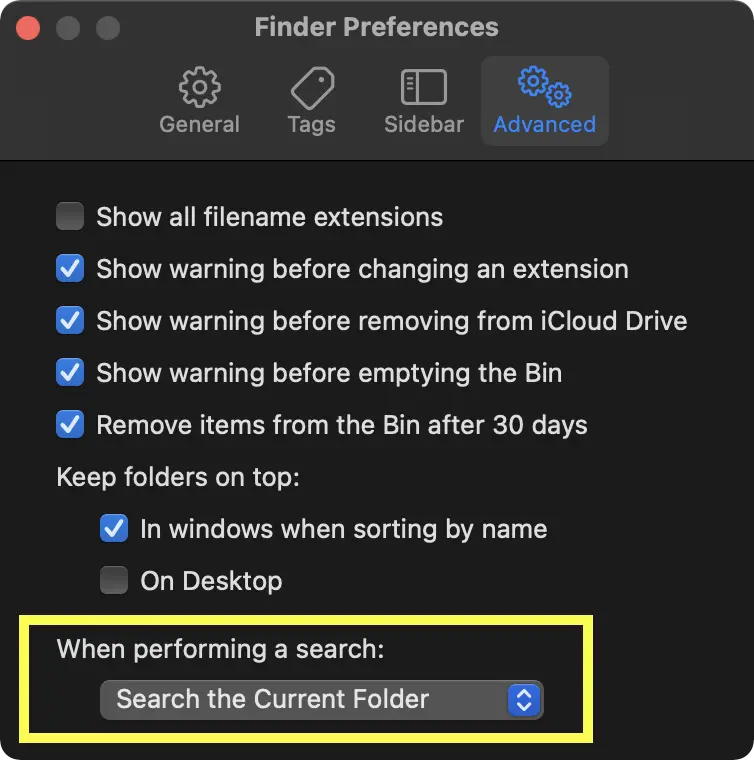
Now I can navigate to the /_assets/images folder in my local Git repository and search for a string to find related images. Easy peasy lemon squeezey.
Managing posts
This is a bit different. I could use Finder for this too, but since Jekyll doesn't care about sub-folders beneath the main _posts directory, I tend to sort all my posts by year, so that makes things more simple when navigating down the folder tree.
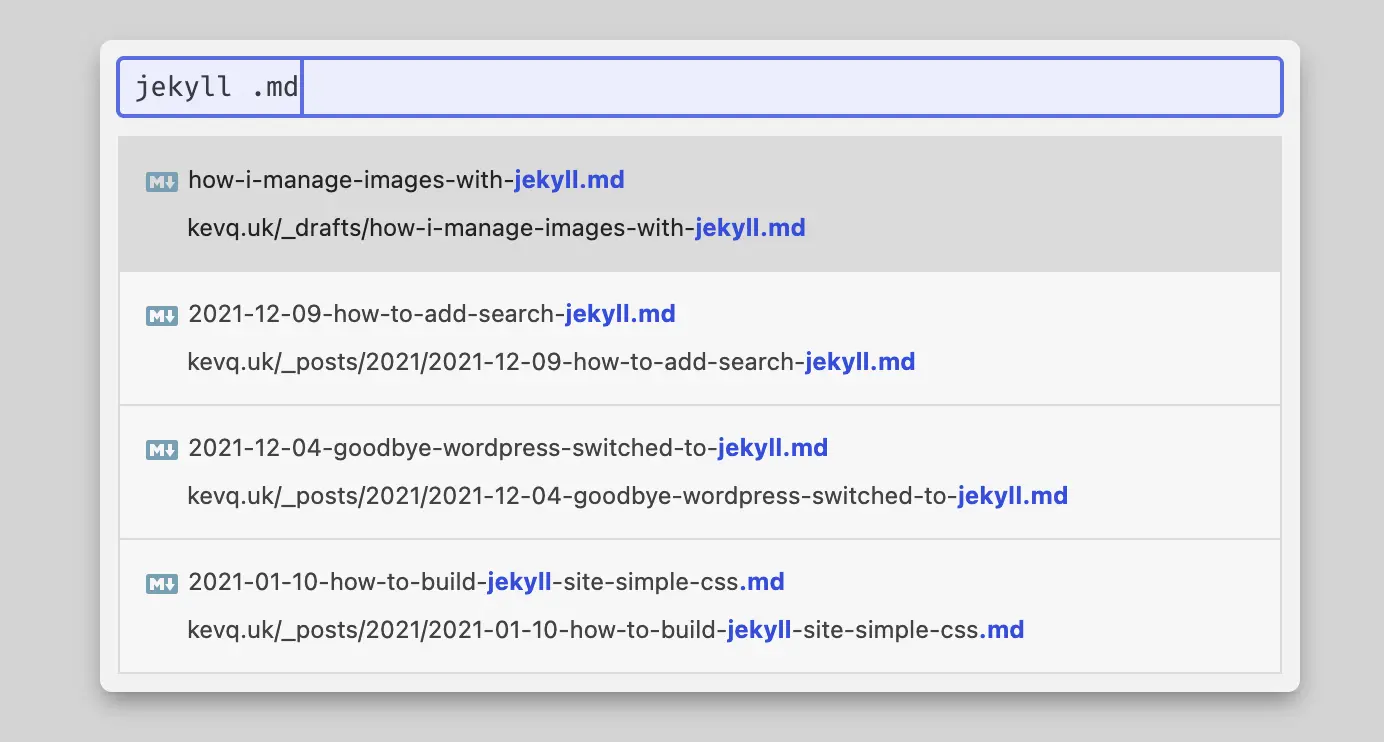
However, that's not simple enough for a simpleton like me. My code editor of choice is Atom so if I need to quickly edit a post, I fire up Atom and hit ⌘+p to open Atom's Fuzzy Finder.
Fuzzy Finder then lets me search the entire repository for anything I like. I tend to search for a keyword followed by a space then .md which will limit the results to Markdown files only, thus only showing pages and posts:
Final thoughts
So there you have it, that's how I manage the content for this site using nothing but MacOS and Atom.
Oh, if you're interested in what I use for actually writing my content, that would be iWriter Pro.
I hope you guys found this post useful. It ended up being way longer than I intended it to be, so apologies if you fell asleep half way through.
Ru, if this post helps you to make a decision as to whether you stick with WordPress, or come back to Static Sites, then my job here is done.
If you think there's a way I can improve this workflow, or if you have any feedback for me, please do use the button below. I'd love to hear from you.
Subscribe for more!
You don't have to keep coming back here to read my latest waffle. There's a couple of ways to subscribe to receive updates whenever I publish new content.